
Student Maintenance: Enrolments
Overview
TWebAdmin 5.40.20 and newer.
Starting with TWebSchAdmin, 5.30.10, Student Maintenance functionality began migrating in three phases to TWebSchAdmin from Core Trillium. This article documents how Enrolment works. In Student Maintenance, most users begin by searching for the Student you wish to work with. Once the Student's record opens to the default Demographics form, Click Enrolments from the Student Maintenance menu.
In TWebSchAdmin 5.30.10 and newer, this page displays the Enrolment Records for the Selected Student for a given School. You can modify that Enrollment information, provided you have the proper Security.
- Full Enrolment History is among the Reports which you can access from the Reports picklist, at top right.
The screen displays the entire enrolment record for one student; despite the year you pick at top right, you'll see a Student's entire enrolment history.
Security
The enrolment page adheres to the "Update Flag" setting for the particular user's role when determining whether the buttons on this page are visible.
FULL NAME | WHERE USED |
STUMNT - Enrol - Enrolment page access | STUMNT - Enrol - Controls access to the enrolment page. |
STUMNT - Reports - Full Enrolment History | STUMNT - Reports - Controls access to Full Enrolment History report from the student Enrolment page or from the landing page reports. |
Modify Enrolment
The most-common reason you'll have a Student open on this page is to modify their Enrolment.
- Search for, and open a Student.
- Click the picklist arrow to the right of Maintain Student, and then Click Enrolments.
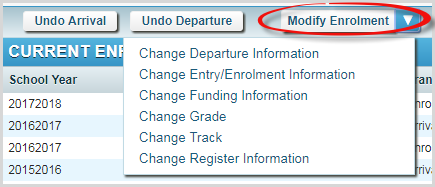
3. Click the arrow to the right of Modify Enrolment and you'll get the picklist you see above, a menu which may grow in future updates.
Change Departure Information
Any of those four pieces of information may be modified if a Departure record exists for an Inactive Student for the selected Year. In fact, this form is only enabled if the Student has a departure in your school during the Current Year.
- If a Student has multiple Departure records for the Current Year (for instance: they've left twice), you can update only the most-recent active Departure record.
- Effective Date is the Date the Student's Departure information takes effect.
- School and its BSID are the student's next school.
- You can enter Remarks as needed, at right.
- Click Save when you've made the choices you need to.
Change Entry/Enrolment Information
You can change the Enrolment information for a student:
- The Effective Date and Entry From information may be modified if an Entry record exists for an Active Student for the selected Year. In fact, the Entry From field is only enabled if the Student enrolled in your school during the Current Year.
- The Enrolment Date is displayed with the Entry From information if an Entry record does not exist for an active Student for the Selected Year. However, you can only modify the Date.
- If a Student has multiple Enrolment records for the Current Year (for instance: Enrolled, then left and has now returned), you can update only the most-recent active Enrolment record set.
- The choice you make in the Entry From picklist determines how much more information you will be asked for, underneath that item.
- Effective Date is the Date the Student's Entry information takes effect.
- You can enter Remarks as needed, at right.
- Click Save when you've made the choices you need.
Change Funding Information
You can change a Student's Funding Information:
- If a Student was registered with an incorrect Funding Source, only the Funding Source should be modified.
- Change both the Funding Source and Effective Date if the source has changed since the date entered.
- Pupil/Other Pupil: Select one of the two options:
- Pupil of the Board - lives within the Board's jurisdiction;
- Other Pupil of the Board - lives outside the Board's jurisdiction.
- Payer Type: Displays how funding is paid.
- For Pupil of the Board:
- Property Taxes: The most common;
- Person: Less common. Occurs when land owned by an individual is tax exempt and the landowner is charged a fee by the Ministry for the Student to attend School. Note: This is not Native. Make this choice and we ask you to fill in Payer's name.
- Gov't of Ontario: Students who are charges of the Government, such as Children's Aid.
- For Other Pupil of the Board:
- Native: Native Students under tuition agreement with a Native Education Authority.
- Gov't of Canada: Tuition is paid by the national government
- Sources outside Ontario - Temporary Residents: This used to be Student Visa. Can be paid by an organization or person.
- Sources outside Ontario - Other Students: In most cases this Student lives just across a Provincial border and attends an Ontario School. Payer can be an organization or person.
- For Pupil of the Board:
- Status: The current Funding state for this Student, such as Partial, Arrears or Waived.
- Click Save when you've made the choices you need.
Change Grade
You can change the Grade Level the Student is enroled in:
- The Effective Date may be changed if the Student's Grade changes during the School Year.
- This information can only be modified for the current School Year.
- Use the Grade Level's picklist to change the Grade.
- Click Save when you've made the choices you need to.
Change Track
You can modify a Student's Track:
- If the Student was initially put in the wrong Track, modify only that.
- If the Student is changing Tracks, you must also enter the Effective Date.
Change Register Information
You can modify a Student's Register Information for either a full-time or part-time Student.
- If the Student was initially given an incorrect Register, modify only the Register Field.
- If the Student is changing from one Register to another, be sure to change the Effective Date as well;
- If the Student is enroled in an elementary school and the change is to Part-Time, the Enrolment Minutes for Oct. 31 and/or March 31, and/or June 30 will also need to be inserted into the appropriate field for Ministry collection.
Undo Arrival or Undo Departure
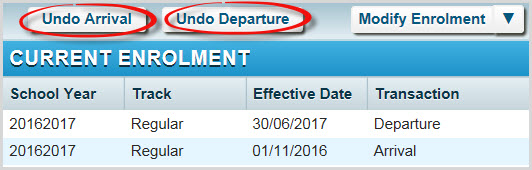
You can undo a current-year Arrival record for a Student, provided no subsequent Departure record exists for them. You can undo the current-year Departure record for a Student, provided they have not re-enrolled with you. If you click either Undo Arrival or Undo Departure and the Student is not eligible, the software advises you of same and doesn't let you proceed.
- Undo Arrival changes a Student's status from Active to Pre-reg.
- Clicking either Unto Arrival or Undo Departure removes either Date, throughout our software.
- Click the button, shown above, you desire.
- Read the message on the resulting pop-up screen.
- Add any remarks you desire.
- Click Undo Arrival or Undo Departure on that pop-up.