
Student Maintenance: Contacts
TWebSchAdmin 5.30.10 and newer
Overview
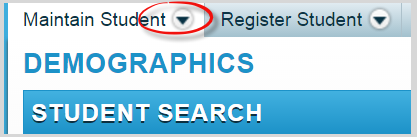
When you enter Student Maintenance, your browser opens to Maintain Student > Demographics > Student Search.
- Using the single-student search window, locate the student whose Contacts you wish to edit.
- Hover over the triangle to the right of Maintain Student. Click Contacts.
- Your display at right displays this student's Contacts.
- Note: The new display may include the Associated Students icon (a student in black graduation attire, fronted by a red diamond surrounding a white exclamation mark). If you click that icon, you'll get a list of Students from other schools in your Board who are associated with that particular Contact.
The top section of this page is read-only, with the exception of Add Contact and Delete Contact.
Select Display Past Contacts to do exactly that.
Viewing/Editing Contact Details
- Select any Contact to view/edit that Contact's Details on the bottom of this page.
- Access: If you assign a Contact No Access, that means the Contact should have no access to the Student in the real world; and, in our software, it locks this Contact out of everything from Guardian and Custody to Lives With and Access to Records. It also gives them no Priority for Contact or Closure and changes how the Contact displays in the Student's Contact list, where No Access displays in white letters in a red box.
- Deceased: If you fill in a Contact's Deceased Date, a Deceased stamp (white letters on a black background) is assigned to their record. Our system also automatically sets that Contact's End Date to equal the Deceased Date. To view the Contact after their End Date, you will have to Select Display Past Contacts.
Delete a Contact
- To delete a Contact, Select that person's Select checkbox, then Click Delete Contact.
- In the resulting window, Click Yes if you truly want to delete this record.
- If the Contact is associated with other Students, you'll get a window giving you the chance to also delete this Contact from the other Student(s). Make your choice(s) and Click Ok.
Add a Contact
Whether you can search for Contacts depends on whether your Board allows your schools to search for Contacts. Some Boards do not; they want each Contact to be a unique occurrence within their Database, which stops Schools from updating each other's information. This is controlled through a TWebSchAdmin preference found in Student Maintenance > Preferences tab > Browse Contact flag.
- Open your Student's Contact list. At the top of the Contact list, Click Add Contact, which opens a search form, because our system wants to see if the Contact you want to add to this Student is already in your database.
- At the top of the form, Click the Person Type picklist. Then choose Contact or Staff
- Beginning with TWebSchAdmin, 5.30.10, you can search Students on Address. Fill in the Street Number and first two characters of the Street. Auto-complete then presents a picklist of all matching addresses. Once you select one, and Click Find, the Contact Results List populates with only Contacts linked to that address.
- Alternatively, fill out the Search box and filters, as needed. This Search will search your entire Board, not just your school. If your Search returns too many rows, our software will tell you. Reduce the possible matches by entering more of the Contact's name or using other filters. Tip: Contacts and Staff tend to have Legal names, not Preferred names.
- Associated Student lets you search through a relationship with another student by entering the associated student's OEN, phone number, and/or student number.
Note: If the Search returns someone already in your database, the Associated Student icon at far right tells you this Contact is associated with at least one other Student, in your school or elsewhere within your Board. Click the icon to learn who it is.
Note 2: We want you to find the right person, which is why the Results show gender, phone, address and why we show you which other Students a Contact is associated with. Use all of this information to help verify you're getting the correct person.
5. To add this Contact to this Student, Click Select. That brings you to the New Contact form.
6. The Contact's Access (top, right) defaults to blank, which is, in effect, No Access. If that's how you wish to leave this Contact, choose No Access from the Access picklist, then fill in only the fields at left which have an asterisk.
7. Otherwise, you will need to change the Access picklist to Access in order to engage most of the choices below it. Fill in as many Details as you care to, or your internal rules require. Fields we require to be filled in are denoted by an asterisk.
Contact Priority: Lower numbers mean they are more important.
Closure Priority: Works the same way and prioritizes which Contact(s) to call in case of unexpected school closures.
Exclude Person from Find: Prevents this Contact from appearing in Search results.
Contact Relationship
The first of three accordion bars allows you to enter and edit relationship information on a single Contact.
Field Descriptors
RELATIONSHIP INFORMATION | |
Relationship | The relationship drop-down list is populated with the Active values from the Relationship validation table and Blank (the default). This field is mandatory. |
Start Date | Defaults to the current date. This field is mandatory. |
End Date | There is no default date. |
Access | The Access drop-down list Options are: Access, No Access, and Blank (the default). This field is mandatory.
If you select Access:
|
Guardian | The student's Contact Guardian flag. If cleared, the Custody, Access to Records and Receives Mail checkboxes are also clear (the default). |
Custody | The student's Contact Custody flag. Default: Deselected. |
Lives With Student | The student's Contact Lives With flag. Default: Deselected. |
Access to Records | The student's Contact Access to Records flag. Default: Deselected. |
Receives Mail | The student's Contact Receives Mail flag. Default: Deselected. |
Speaks School Language | The student's Contact Speaks School Language flag. Default: Deselected. |
Contact Priority | The student's Contact Priority. Valid entries between 1 and 99. Default: Blank. The field is mandatory. |
Closure Priority | The student's Contact Closure Priority. Valid entries are between 1 and 99. Default: Blank. The field is mandatory. |
Mode of Communication | The student's Contact Mode of Communication. The drop-down list populates with the values from the Communication Modes validation table and blank (the default). The field is mandatory if the board preference Mandatory Communication is ON. |
Organization | The student's Contact Organization name. The drop-down list populates with the values from the Organizations - Others validation table and blank (the default). |
Remark | The student's Contact Remark. Maximum: 2000 characters. |
PERSONAL INFORMATION | |
Title | The contact's Salutation. The drop-down list populates with the Active values from the Salutations validation table and blank (the default). |
Preferred Surname | The contact's Preferred Surname. Maximum: 40 characters. Default: Blank |
Preferred First Name | The contact's Preferred First Name. Maximum: 20 characters. Default: Blank |
Preferred Middle Name | The contact's Preferred Middle Name. Maximum: 20 characters. Default: Blank |
Place of Employment | The contact's Place of Employment. Maximum: 70 characters. Default: Blank |
Catholic | Select this field if the contact is Catholic. The field is visible if the preference PrefCatholic is ON. The field is clear by default. |
Exclude Person From Find | Select this field if the contact is to be excluded from the Find Person functionality. |
Gender | Contact's Gender. Current values are Male, Female, and Unknown (the default). |
Birth Country | Contact's Birth Country. The drop-down list is populated with the Active values from the Countries validation table and blank. Default: Blank |
Status in Canada | The contact's Status in Canada. The drop-down list is populated with the Active values from the Status in Canada validation table and blank (the default). |
Arrival Date | The contact's Arrival Date. |
Deceased Date | The contact's deceased date. If the field is not empty:
When the field is changed to empty:
|
Preferred Language | The contact's Preferred Language. The drop-down list is populated with the Active values from the Languages validation table and blank (the default). |
Over 18 Student Consent | The field is visible if the student is 18+ years old and the hidden preference Over18permissioncheck is ON. The hidden preference is set automatically the first time that the P_OVER18_CONSENT database procedure is run on the Trillium database. If the procedure is never used, the "Over 18 Student Consent" option will not be available on the Contacts tab page. |
LANGUAGE INFORMATION | |
Language Name | The contact's Language. The drop-down list is populated with the Active values from the Languages validation table and blank (the default). This field is mandatory. |
First Language | Selecting this field indicates this is the contact's First Language. |
Spoken at Home | Selecting this field indicates this Language is spoken in the home. |
Remark | The Language remark, which has a maximum of 240 characters. |
Command Buttons | |
Save | The button is visible if you have update privileges. |
Add | The button is visible if you have update privileges. On click, a blank row is added as the first row to the Contact Language Information table. |
Delete | The button is visible if you have update privileges. On click, the selected row is deleted from the Contact Language Information table and your database. |
Contact Addresses
The second of three accordion bars allows you to maintain selected Contact addresses. A Contact may have several addresses on file, such as home and mailing address.
If you do not have enough privileges to access this bar, you will not see the bar.
Addresses list
- This is the list of active addresses defined for the selected Contact
- Use Display Past Addresses checkbox to display end dated addresses
- Use the Edit button to maintain Contact address(es)
EDIT ADDRESSES
Use this window to add, update and/or delete addresses for the selected Contact.
Pop-up window Controls
| Window Controls | |
Address Format | Select the format of the Contact addresses, different fields may be displayed to accommodate the selected format. |
Address Type | Select the address type from the drop-down list. Address types classify addresses into categories. |
Priority | Use this field to order the Contact's addresses of the same type. The system will use this field to be able to identify which address to select when the Contact has more than one active address of the same type. The system will select the one with the highest priority. Example if the Contact has 2 active home addresses with priorities 3, 4 respectively. When extracting a Contact's home address, the system will pick the address with the highest priority. |
Start Date | Enter or select the date on which this address takes effect. When you add a new address, this field defaults to today's date. However, the Start Date can be set to a future or a past date. |
End Date | Enter or select the date on which this address is no longer valid. |
Number | Enter the street number (e.g., 104). If there is any alpha indicator (e.g., 104 A), enter it in the Qualifier field next to it. |
Qualifier | This field is used to hold alpha characters that may be attached to the street number. |
Street | Type the street name and select the street from the list of streets displayed as you type. The streets that appear on this list were previously populated in the Jurisdiction/Streets validation table.If the street is not listed, click on the Add button, to add a new street for the jurisdiction selected. Please note that this function may not be available to your school, depending on how your Security was set up. |
Unit Type | Specify the type of unit, if applicable, such as Apartment (Apt) or Suite (Ste). A list of these types is maintained in the Unit Types validation table. |
Unit Number | If Unit Type was selected, identify the specific unit as assigned by the building. When the unit identifier is a number, present it in a numeric format (e.g., Apt 2). |
Site | In many rural areas, extra address information could include Site, Compartment, Group or Box. These should be included as part of the address. Enter the site number, if applicable. |
Compartment | Enter the compartment number, if applicable. |
Group | Enter the group number, if applicable. |
Box | Enter the box number, if applicable. This is not to be confused with a P.O. Box, which, if present, is identified in the Delivery Type field. |
Delivery Type | This designator identifies the type of delivery service, which can be selected from the drop-down list. Examples include General Delivery, Post Office Box and Rural Route. The types available are listed in the Delivery Type validation table. |
Delivery No. | If a Delivery Type is selected, a number must accompany it (with the exception of General Delivery). For example, if a student lives in Rural Route number 3, "RR 3" will appear on the printed address. |
Installation Type | The Installation Type is an optional element in rural areas with more than one Canada Post installation. The options include Community Mail Center, Post Office and Retail Postal Outlet. The types available are listed in the Installation Type validation table. |
Installation No | If any Installation Type is selected, it must be accompanied by a number. |
City/Town | Select the name of the city or town from the drop-down list. This list is maintained in the Jurisdiction/Streets validation table, where streets are mapped to jurisdictions. |
Township | Select the township from the drop-down list. This is an optional field that appears in both civic and rural addresses. The information entered will not appear on any printed data. This list is maintained in the Townships validation table. Township does not print on reports. |
Province/Sate | Select the province from the drop-down list. The types available are listed in the Province/State validation table. |
Country | This field defaults to "Canada". |
Postal/Zip Code | Entering the Postal/Zip Code for the address. |
Contact Phones and Emails
The third of three accordion bars allows you to maintain selected Contact's phones and emails. A Contact may have several phones and/or emails on file.
If you do not have privileges to access this bar, you will not see the bar.
- This is the list of active phones defined for the selected Contact
- Use the Edit button to maintain Contact phone(s)
EDIT PHONES
Use this window to add, update and/or delete phones for the selected Contact
| Window Controls | |
Priority | Use this field to order Contact's phones regardless of phone type. The system will use this field to be able to identify which phone to select when the Contact has more than one active phone. The system will select the one with the highest priority. Example if the Contact has several phones defined. When extracting a Contact's phone, the system will pick the phone with the highest priority regardless of its type (home, cell…etc.) |
Type | Select the type of phone record from the drop-down list. |
Area | Enter the area code. An area code will be defaulted if the board defined one. |
Phone | Enter the phone number. |
Extension | Enter the extension (if applicable). |
Listed | Select this box to indicate if the phone number is listed. |
Start Date | Enter the date that this phone number is in effect. |
End date | This field can be left blank for new phone numbers. Discontinued phone numbers can either be deleted or end-dated. Either method will ensure that an old phone number will not be displayed on a report. |
Remark | Enter any notes or explanations regarding this phone number |
Emails
- This is the list of emails defined for the selected Contact
- Use the Edit button to add, update or delete Contact email(s)
| Window Controls | |
Priority | Select from the list the priority of use of this email. |
Enter the Contact email address. | |
Start Date | Enter the date that this email is in effect. |
End date | This field can be left blank for new emails. Discontinued emails can either be deleted or end-dated. Either method will ensure that an old emails will not be displayed on a report. |
Remark | Enter any notes or explanations regarding this email address, |