
Continuing Education: Lesson Completion
Overview
Either through the TWebSchool Landing Page or by a saved link, you're in the Continuing Education portion of Trillium Web; TWebCE. As shown below, you've gone here: Lesson Based Courses > Lesson Completion.
Lesson Completion
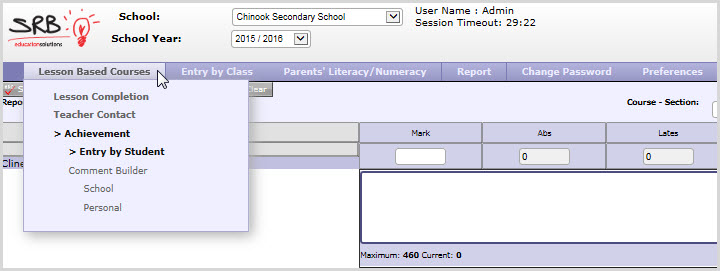
This CE Lesson Completion task can be assigned to the Class teacher or an administration support person, depending on the policy/processes of your board and school. As you see above, the Lesson-Based Courses menu option gives you access to the Lesson Completion, Teacher Contact and Achievement pages.
Student Final and Exam Marks, Due Dates and Submission Dates and Lesson Comments are set on the Lesson Completion page. Only Courses that have already started and were not dropped by the student can have information entered.
The Lesson Completion page is divided into the two sections show below, Search Students on the left and Lesson Details for the selected student on the right.
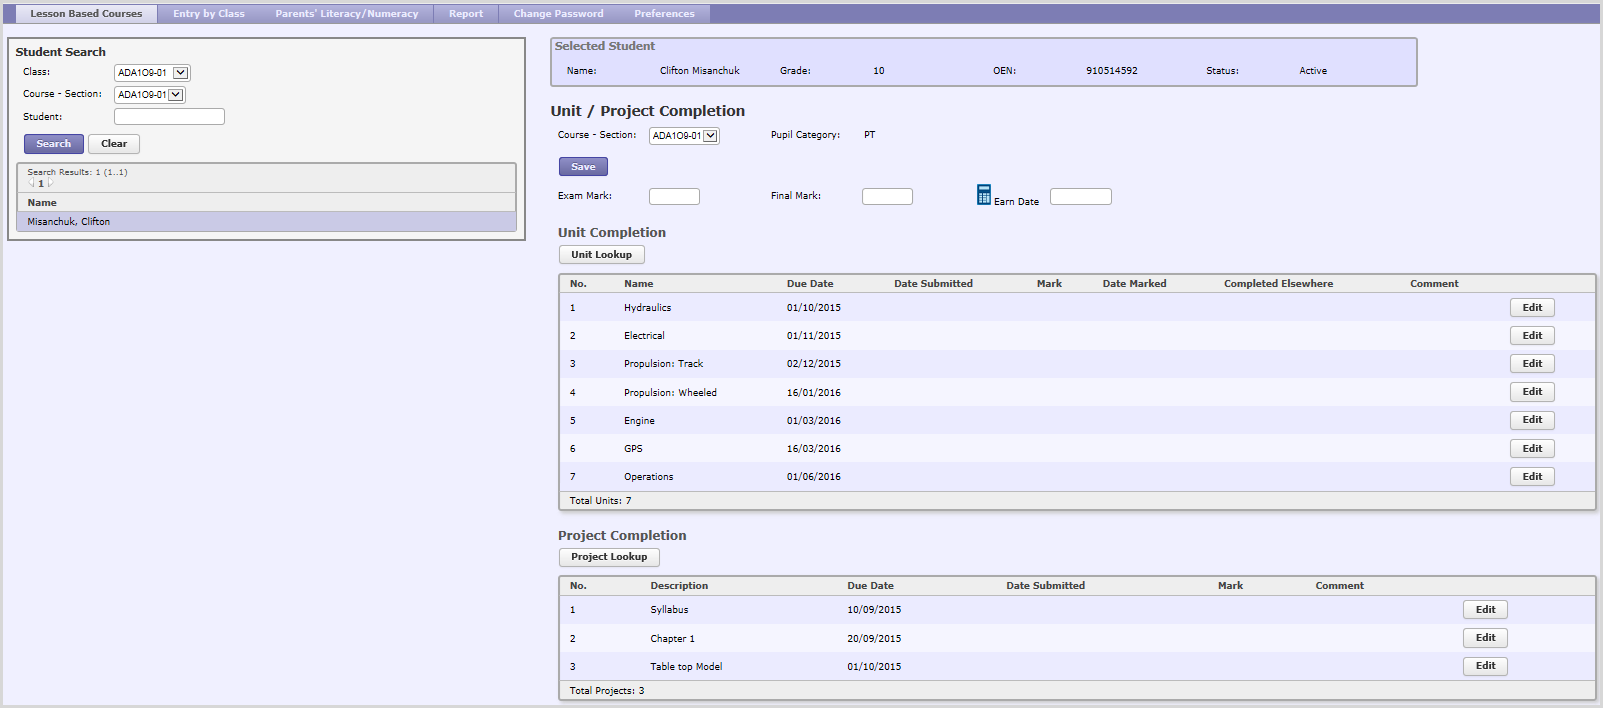
Student Search
This section is used to search for a student or a list of students by one or more search criteria.
- Class: Only classes assigned to the user will be listed. This field is Mandatory and is used to search students assigned to a particular Class.
- Course/Section: This is a list of Course sections attached to the selected Class. Use this field to list students assigned to a particular Course section. Entering information for this prompt is optional.
- Student: Use this field to search by Student Name. You can enter a full or partial name. For example, entering the letters "sm" will restrict the search to students whose full names contain "sm" such as Tammy Smith or Jasmine Jones
- Search: Click Search to list the students based on the selected criteria. The results list populates below Search and Clear, as shown in the above screen shot.
- Clear: Click Clear to clear the search criteria fields and start a new search.
Once you select a student from the list, the right side of the page will be populated with the student's units and projects.
The very top portion displays the selected student's demographic information: Name, Grade, OEN and Status.
Unit/Project Completion
Under the student's four pieces of information, these are first items at the top of the main window:
- Course-Section: Displays the student's Course Section
- Pupil Category: Displays the student school enrolment register. It is calculated from the FT Other Board and PT Other Board checkboxes located on the Student Programs/Registration tab
- Exam Mark: Valid values are 0 - 100 or N/A (no Exam is required).
- Final Mark: Valid values are 0 - 100 for all Courses, and "I" for Grade 9 or 10 Courses.
Calculate button The Calculate button (looks like a hand-held calculator) is used to Calculate the Course's Final Mark, based on the weighting criteria defined by your Board. For example, the Board can specify that 70% of the Final Mark is taken from the average lesson Mark, and 30% from the Exam Mark.
Earn Date: Enter the date when the Exam Mark was earned. A calendar is available for you to select a date.
- Click Save to store your student's Final and Exam Marks and the Pupil Category. When a Final Mark is entered, the student’s Earned Credit for the Course will also be automatically calculated.
Unit Completion
The data in the main chart displays the Units you set up here:
Unit Lookup
Click Unit Lookup to display this pop-up. On it, you'll be able to define the percentage of the Unit Marks and the Exam Mark to be used when automatically calculating the Final Mark. You may also specify the number of lessons for the Course and the Due Date for each lesson.
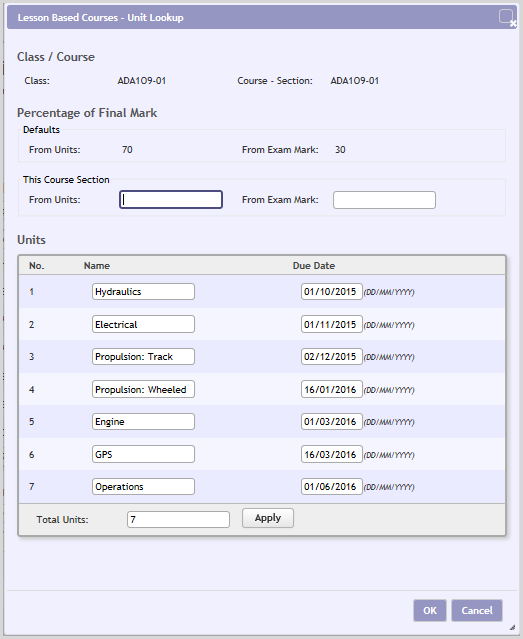
At the top of the pop-up, you'll see the Class and the Course Section, which are read-only.
In the middle, you'll see Percentage of Final Mark, where Default percentages are displayed, before giving you the opportunity to edit them for this Course:
- From Units: Enter the percentage. Valid values: 0-100
- From Exam Mark: Enter the percentage. Valid values: 0-100
- Name: Enter the name of the lesson.
- Due Date: Default value is Blank. Any valid date will be accepted. Either enter dd/mm/yyyy or click in the white box to use the calendar.
At the very bottom of the window, you may define the number of units.
- Total Units: Enter the number of units for the selected Course section. The Maximum number of units allowed is specified in Core Trillium. If not specified, the max number will default to 20.
- Note: If you reduce the number of units to less than the number that have been created, the Apply button will delete the records from the bottom up until the total number of units reaches the specified number. Records will not be deleted if student records exist for the lesson(s). Instead, the following message will be displayed: Cannot change the number of lessons to x. Student records exist for the lesson(s) to be deleted: Student Name, Student Number.
- Click Apply to create unit records equal to the specified number of total lessons. The lessons will be created in a sequential order. Each lesson will be attached to a sequential number created by our system.
- Click OK to save your changes and close the pop-up.
- Click Cancel to close the pop-up without saving the changes.
Unit Completion -- Main Chart Display
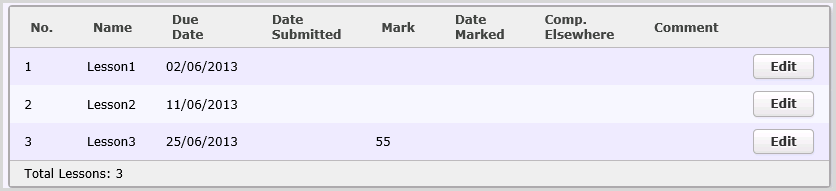
- No. Sequential number generated by our system.
- Name: The Unit as you named it.
- Due Date: The lesson Due Date as you set up.
- Date Submitted: The date when the lesson work was submitted by the student.
- Mark: The lesson Mark is a number between 0 and 100 or an "I".
- Date Marked: The date the Mark was entered
- Completed Elsewhere: The Completed Elsewhere checkbox is unchecked by default. When it is Selected, that Unit/Lesson will not be included in this school's Continuing Education Register.
- Comment: Comments entered for the Unit.
- Edit: When you Click Edit, you'll get this pop-up:
Edit Unit
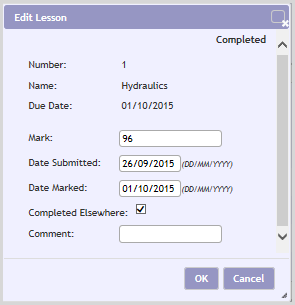
- Number, Name and Due date fields will be display only.
- Mark: Enter the Student's Unit Mark. Valid values are values between 0 and 100 or an "I".
- Date Submitted: Enter the date when the work was submitted. It defaults to the current date
- Date Marked: Once the Mark is entered and the Date Marked field is empty, the Date Marked field will automatically default to the current date. You'll be able to enter another date or select a date from the calendar.
- Completed Elsewhere: The Completed Elsewhere checkbox is deselected by default. When it is selected, this unit/lesson will not be included in this school's Continuing Education Register.
Note: For students who begin a Course at one school and then move to a different location, the new school cannot automatically continue to use the existing Course information. Trillium's security rules governing the separation of one school's information from another would prevent it. The checkbox Completed Elsewhere can be used to indicate the student has done the work in the earlier lesson units.
Note II: If the lesson unit has been completed, i.e. the student has a lesson Mark, or has completed the unit elsewhere, or got a Completion Mark – the Completed label appears in the top right corner of the pop-up window.
- Comment: This is a free-text field in which you may enter Lesson Comments.
- Click OK to save changes and close the pop-up.
- Click Cancel to close the pop-up without saving.
Project Completion
Project Lookup
Click Project Lookup to display the Project Lookup pop-up window, where you're able to specify the Projects for the Course and the Due Date for each.
- Class and Course Section are displayed as view-only.
- Fill in Description and Due Date as you wish.
- The bottom section is used to define the number of projects:
- Click Apply to create the project(s) record. This button is used to create Project records equal to the specified number of total Projects. The Projects will be created in a sequential order. Each will be attached to a sequential number created by our system.
- OK Save changes and close the pop-up.
- Cancel Close pop-up window without saving the changes.
Project Completion -- Main Chart Display

- No. – Sequential number generated by the system.
- Description – The Project description as specified by the user.
- Due Date – The Project’s Due Date.
- Date Submitted – The date when the Project work was submitted by the student.
- Mark – The Project Mark. It is a number between 0 and 100 or an "i".
- Comment – Project comments as specified by the user.
- Edit – Click Edit to do this:
Edit Project
When you Click Edit on the far right, you'll get this pop-up:
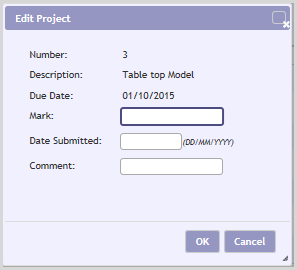
Project Number, Description and Due Date fields will be view-only.
- Mark: The Project Mark. It is a number between 0 and 100 or an "i".
- Date Submitted: The date the project work was submitted by the student.
- Comment: Free text field containing Project Comments you enter.
- OK: Save changes and close the pop-up.
- Cancel: Close pop-up without saving the changes.