
The Duplicate Contact Prevention feature introduces a structured, approval-based process to ensure accuracy and consistency in PowerSchool SIS. By requiring approval, implementing matching logic, and supporting both manual and automated workflows, districts can eliminate duplicate records, enhance efficiency, and maintain high-quality contact data throughout the system. This enhancement introduces a robust approval workflow to prevent the creation of duplicate contact records in PowerSchool SIS when using Enrollment Express/Ecollect Forms.
To use this feature, the following versions are required:
-
Enrollment Express/Ecollect Forms: 25.9.0.0 or above
-
PowerSchool SIS: 25.9.0.0 or above
Previously, when a parent or responder added a new contact in a form, the system automatically created a new contact record in PowerSchool SIS without verifying if the same contact already existed. The absence of duplicate detection frequently resulted in multiple duplicate contact records, creating significant data management challenges for districts.
With the Duplicate Contact Prevention feature, a contact matching process has been introduced as part of the approval workflow. When a new contact is added, the system queries PowerSchool SIS for potential matches:
-
If a match is found, administrative staff must decide whether to create a new contact or link the response to the existing record.
-
If the record is matched, the existing PowerSchool SIS contact is updated with new details and linked to the student.
-
If no match is found, a new contact record is created and linked to the student.
This process greatly reduces duplicate records, improves data accuracy, and streamlines contact management within PowerSchool SIS.
Mandatory Approval Workflow
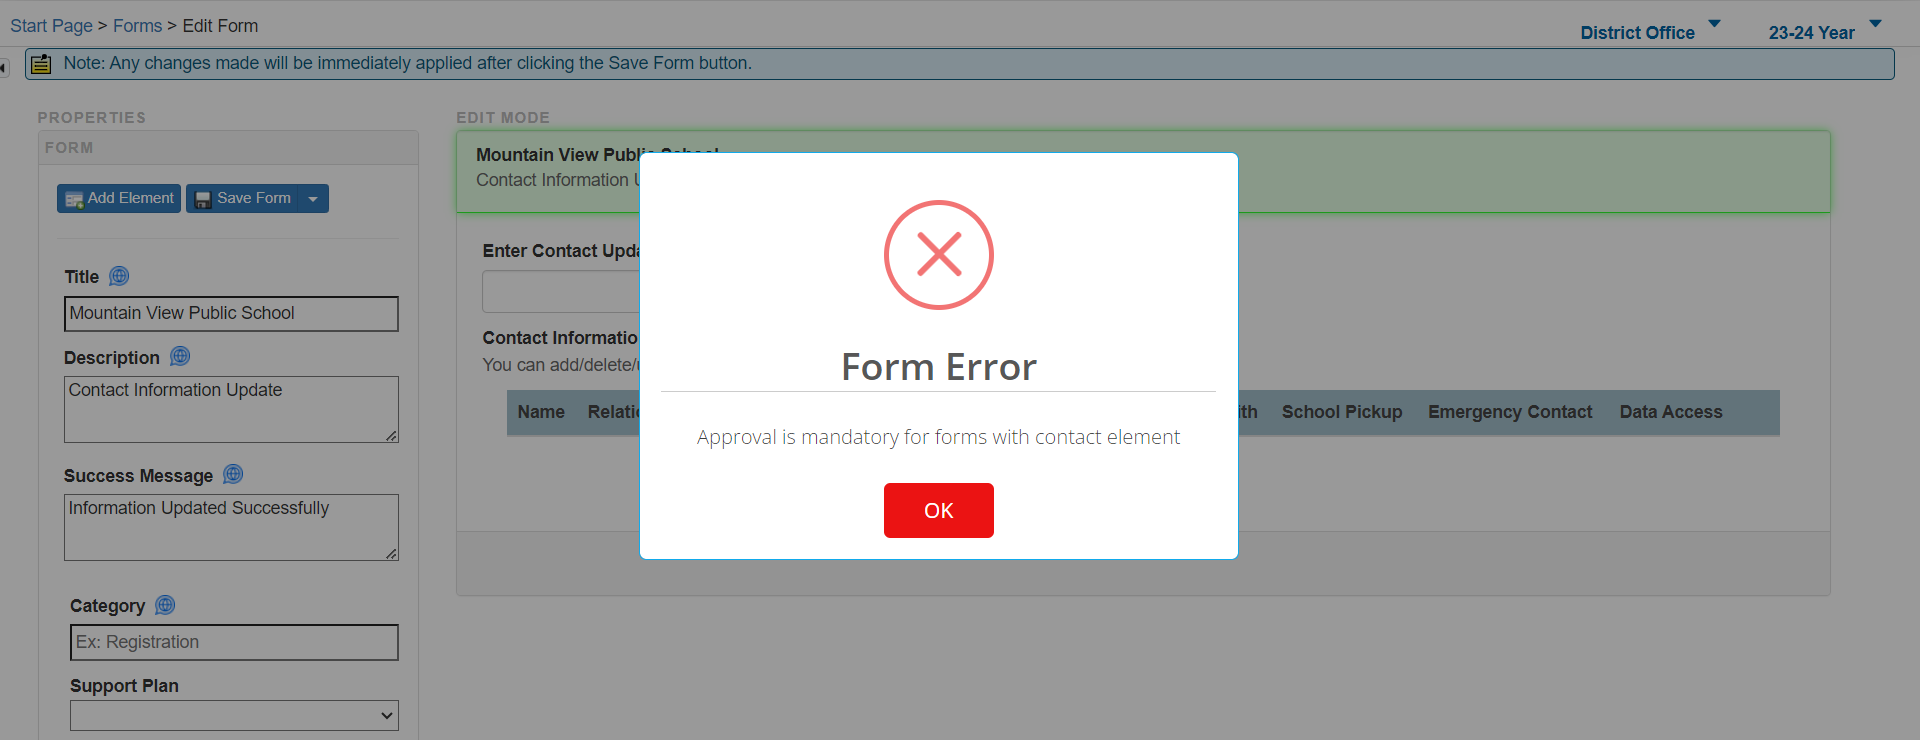
To ensure consistency and prevent duplication, form approval is mandatory for contact forms using the Duplicate Contact Prevention feature.
-
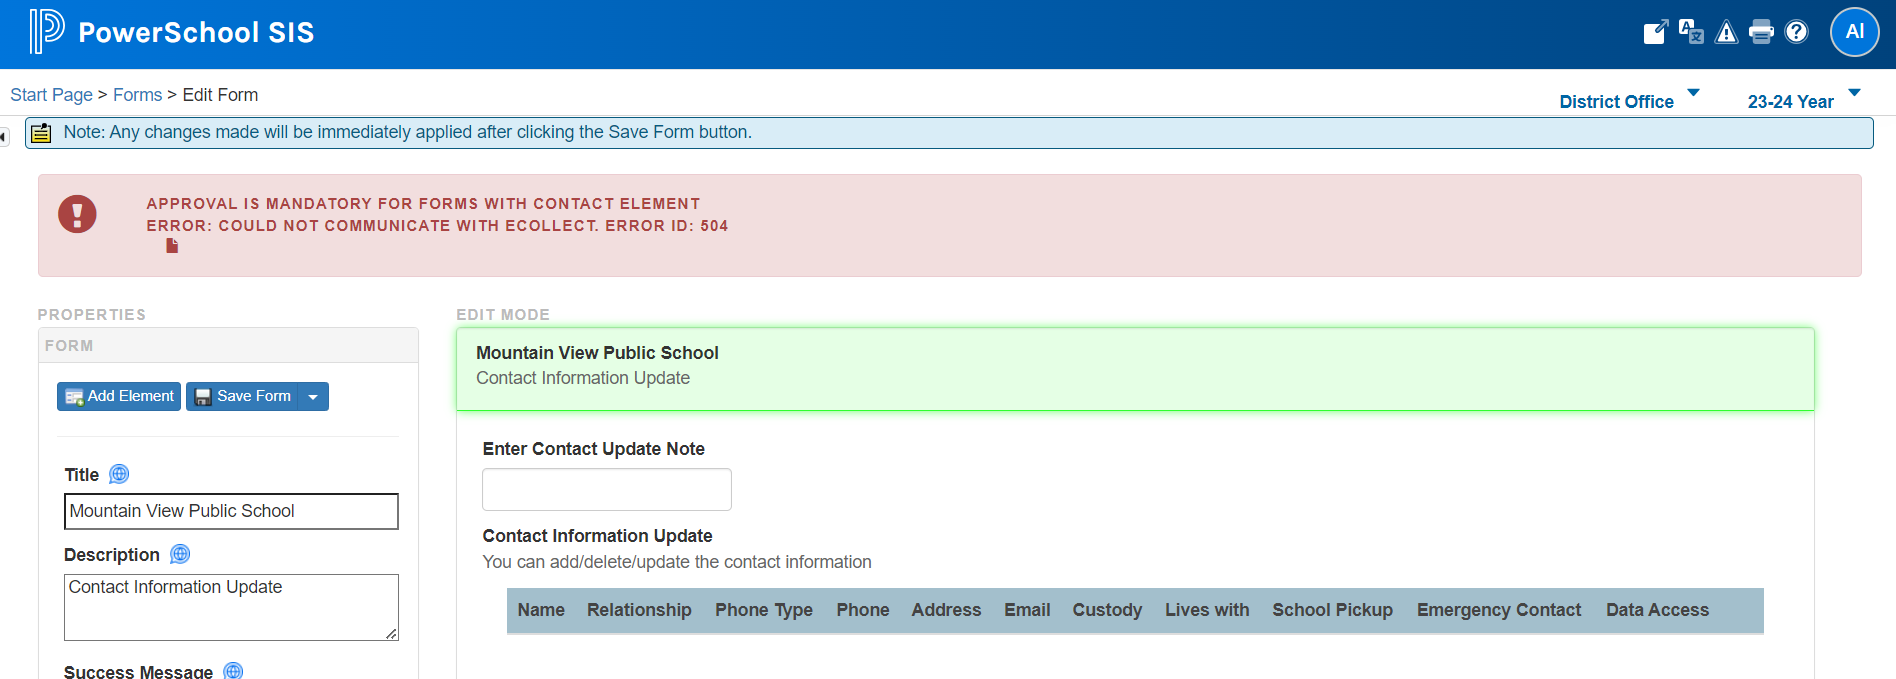
If form approval is not enabled, the system blocks the approval process.
-
When admins attempt to approve a form without approval enabled, they will see an error message and a disabled approval button.
Examples of these behaviors can be seen in:
After applying the 25.9.0.0 version, approval will not be automatically enabled. Districts must manually enable form approval in the menu path: Form Editor – Form Properties.
This workflow ensures that existing customers using older forms cannot bypass approval, thereby maintaining data consistency across PowerSchool SIS records.
Handling Pending Responses Before and After 25.9.0.0
Forms submitted before 25.9.0.0 and after 25.9.0.0 behave differently depending on whether approval was enabled:
-
Before 25.9.0.0, for forms containing a contact element, pending responses submitted will be handled in the following manner:
-
If the form approval is previously enabled, Pending form responses will not be delivered directly to PowerSchool SIS; the Administrator must click the Approve button to deliver to PowerSchool SIS. Approval triggers the older data delivery method.
-
If form approval is not enabled, Parent submission itself delivers contact data to PowerSchool SIS. (This will be limited to only pending responses submitted before 25.9.0.0).
-
-
After 25.9.0.0, for forms containing a contact element, all pending responses submitted will be handled in the following manner:
-
If the form approval is previously enabled, Pending form responses will not be delivered directly to PowerSchool SIS; the Administrator must click the Approve button to deliver to PowerSchool SIS. Approval triggers the older data delivery method.
-
If approval is not enabled, when the parent submits the form:
-
Parents see the submitted status as Pending Approval against their record.
-
Administrators see the pending status against the response in both the Response Report and the Student Forms, but cannot approve.
-
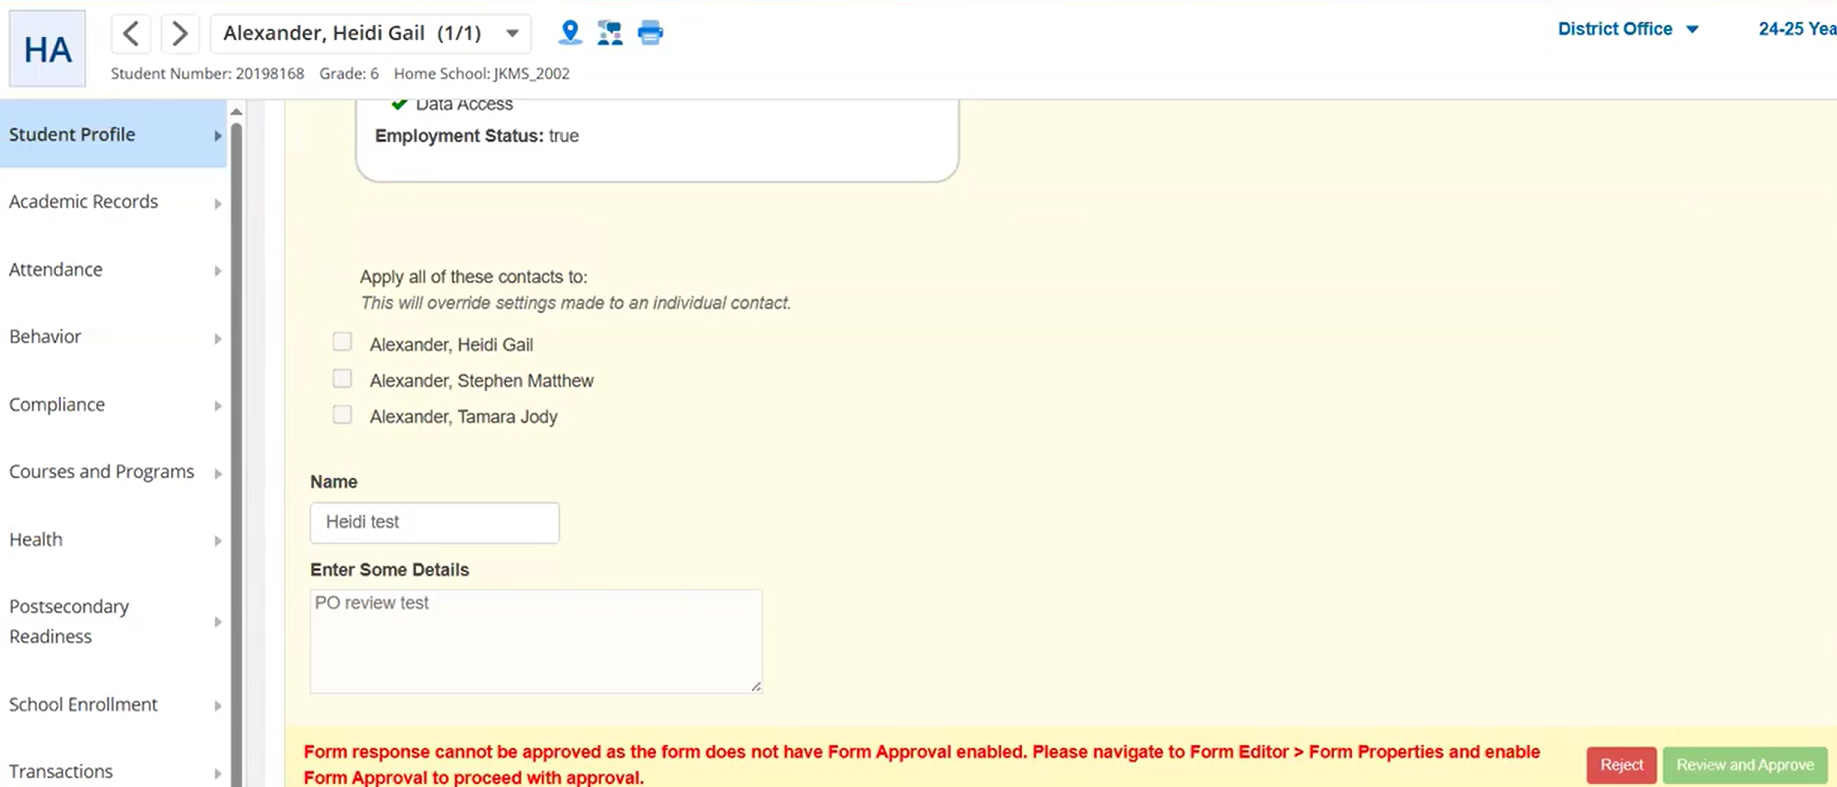
Attempting to approve via Student Forms will disable the approval button in the footer, and the following error message is displayed next to the Approve button in the footer:
-
Form response cannot be approved as the form does not have Form Approval enabled. Navigate to the menu path: Form Editor – Form Properties and enable Form Approval to proceed with approval.
-
-
Attempting to approve via Response Report, regardless of whether the administrator attempted single or bulk approval, administrators can view the Error window for the respective record with the following error message:
-
Form response cannot be approved as the form does not have Form Approval enabled. Navigate to the menu path: Form Editor – Form Properties and enable Form Approval to proceed with approval.
-
-
-
-
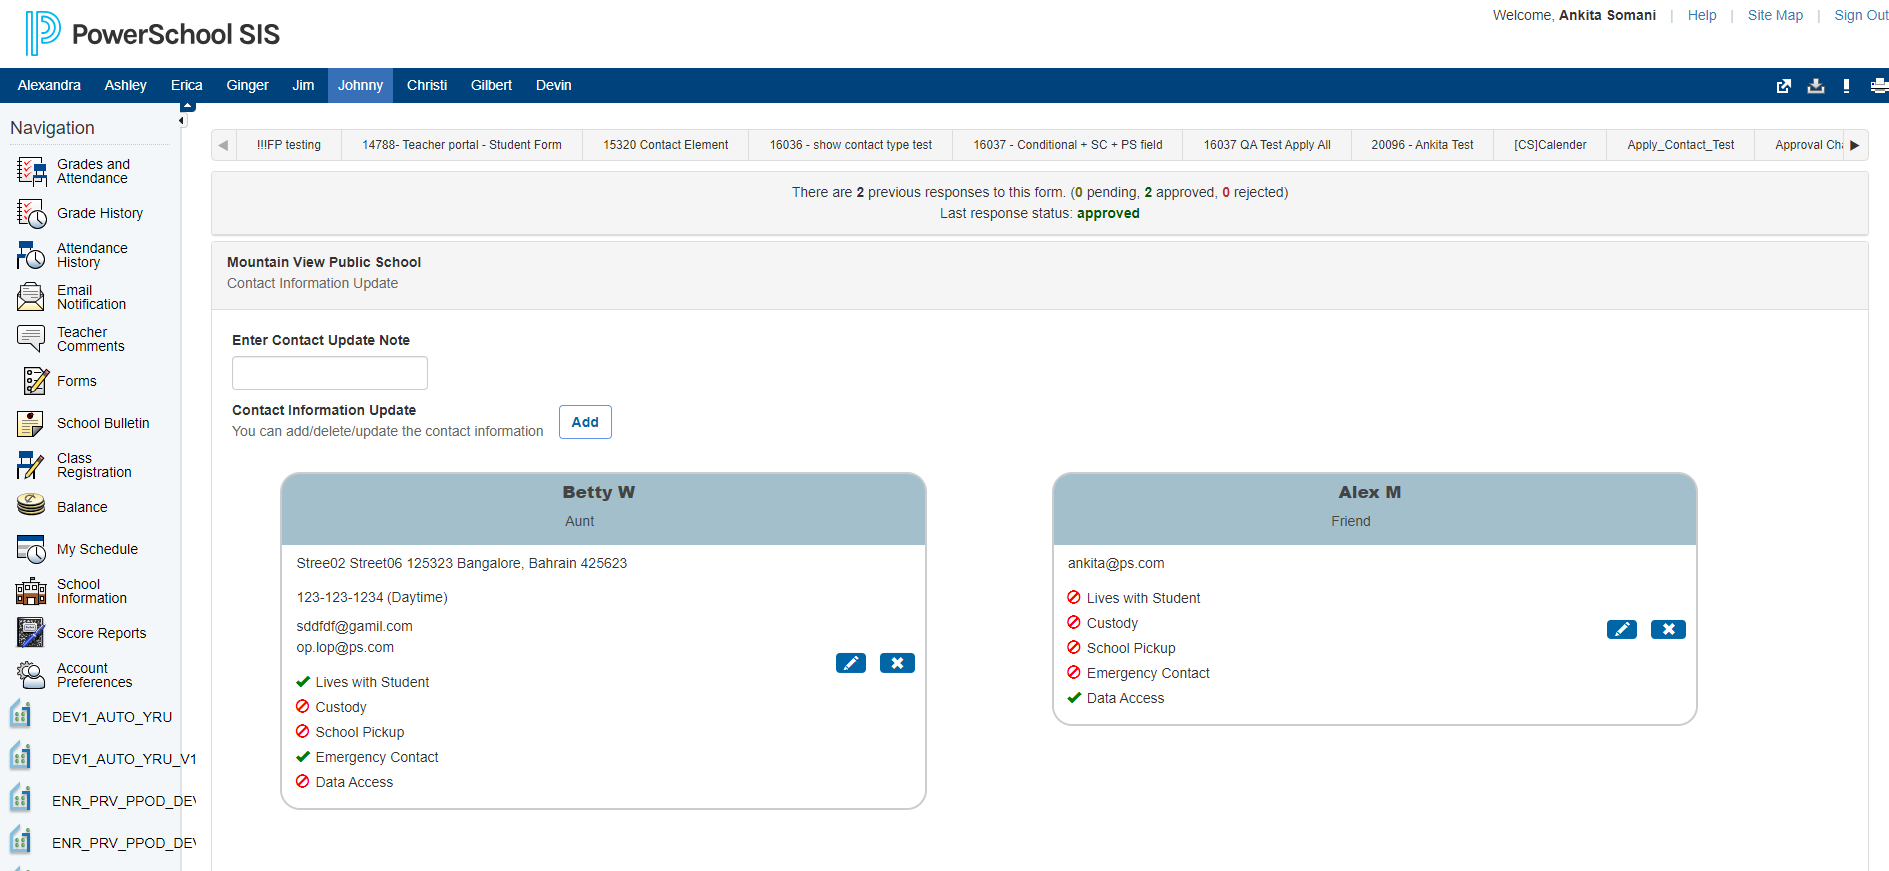
Contact Status in Forms
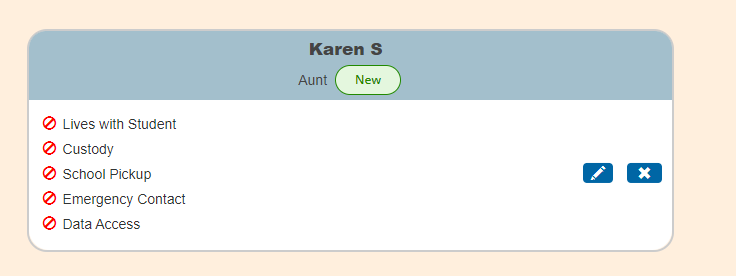
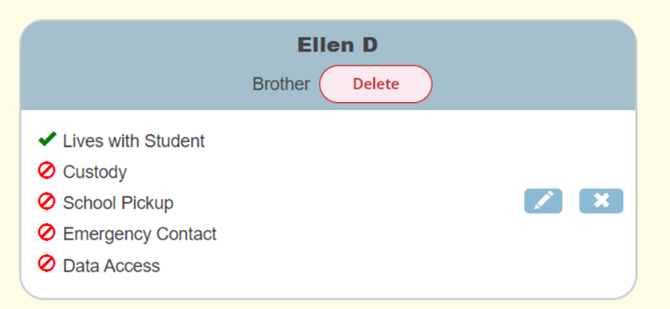
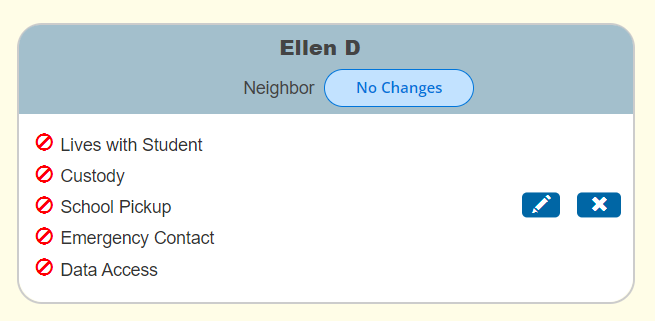
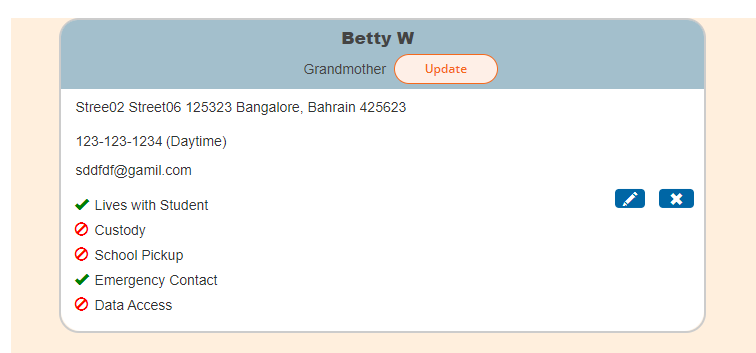
Each contact card within a form displays a status to indicate the action taken on the contact.
|
Status |
Action |
Window |
|---|---|---|
|
New |
When a user adds a new contact successfully, the contact card shows the New status. |
|
|
Delete |
When a user deletes a contact successfully, the contact card shows the Delete status. |
|
|
No Changes |
When a user has not performed any changes, the contact card shows the No Changes status. |
|
|
Update |
When a user updates an existing contact successfully, the contact card shows the Update status. |
|
These statuses are visible to responders only after submission, when the form is in pending approval. They are also included in exported PDF versions of the form.
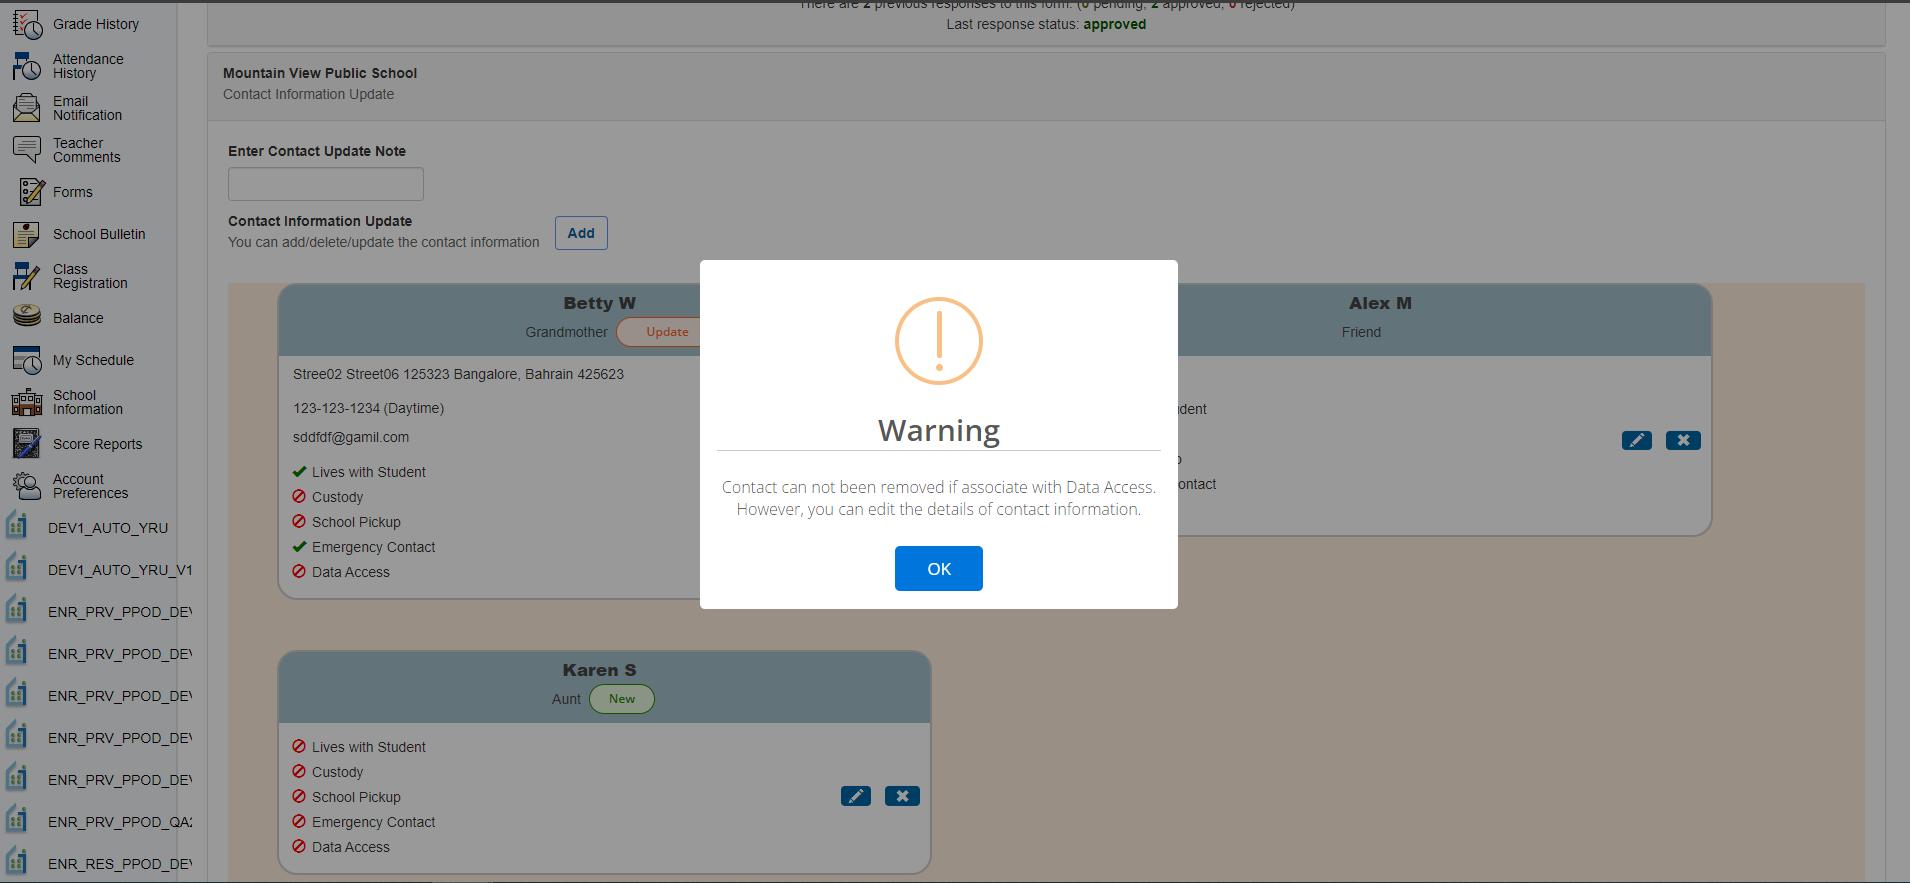
Note: If a contact is associated with Data Access, it cannot be deleted. However, responders can still edit the contact information before submission.
Form Responder Workflow
Responders can submit the form with contact changes as described. After submission, the form is placed in Pending Approval status and will stay there until an Administrator approves it. Responders will see the pending status reflected in their submission history.

Administrator Workflow
Administrators have multiple options for accessing and approving form submissions:
-
From Reports
-
Navigate to Form Reports – Response Reports – Show by Person – Generate Report – Use Approve Action (Single or Bulk Approval).
-
Navigate to Form Reports – Response Reports – Show by Response – Generate Report – Use Approve Action (Single or Bulk Approval).
-
-
From Student Records
-
Navigate to Student Search – Student Forms – Review and Approve using the footer buttons.
-
Or navigate to Form Reports – Response Reports – Generate Report, click the Student Number to access Student Forms, and Review and Approve using the footer buttons.
-
When approving, school and district administrators are prompted to enter their password.
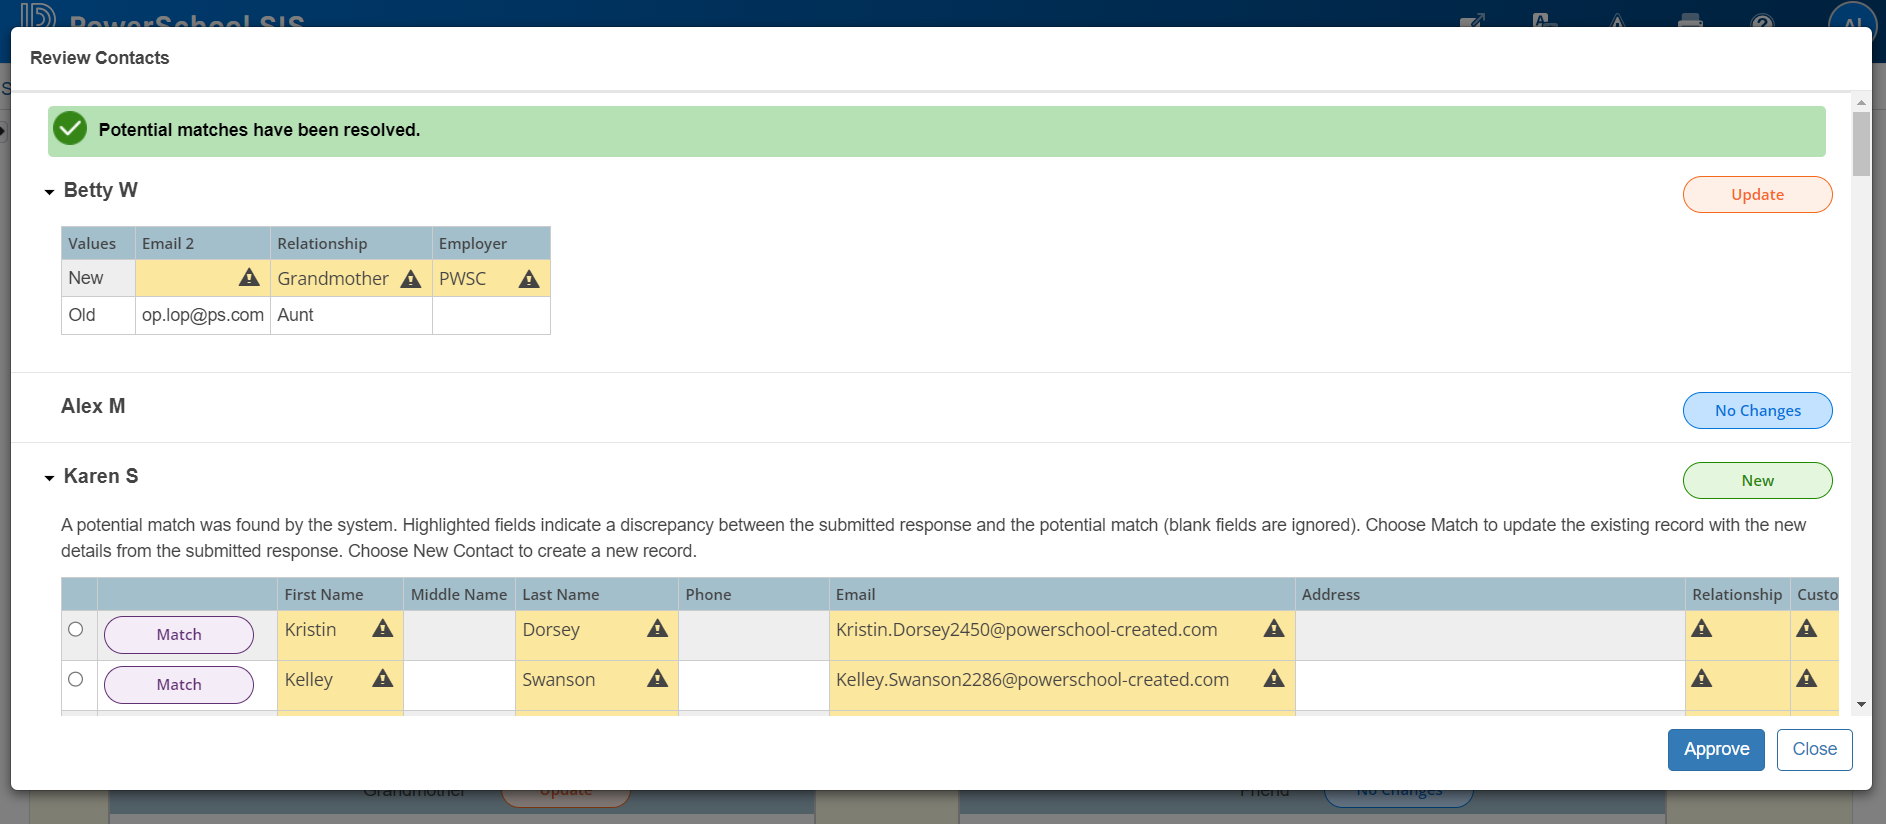
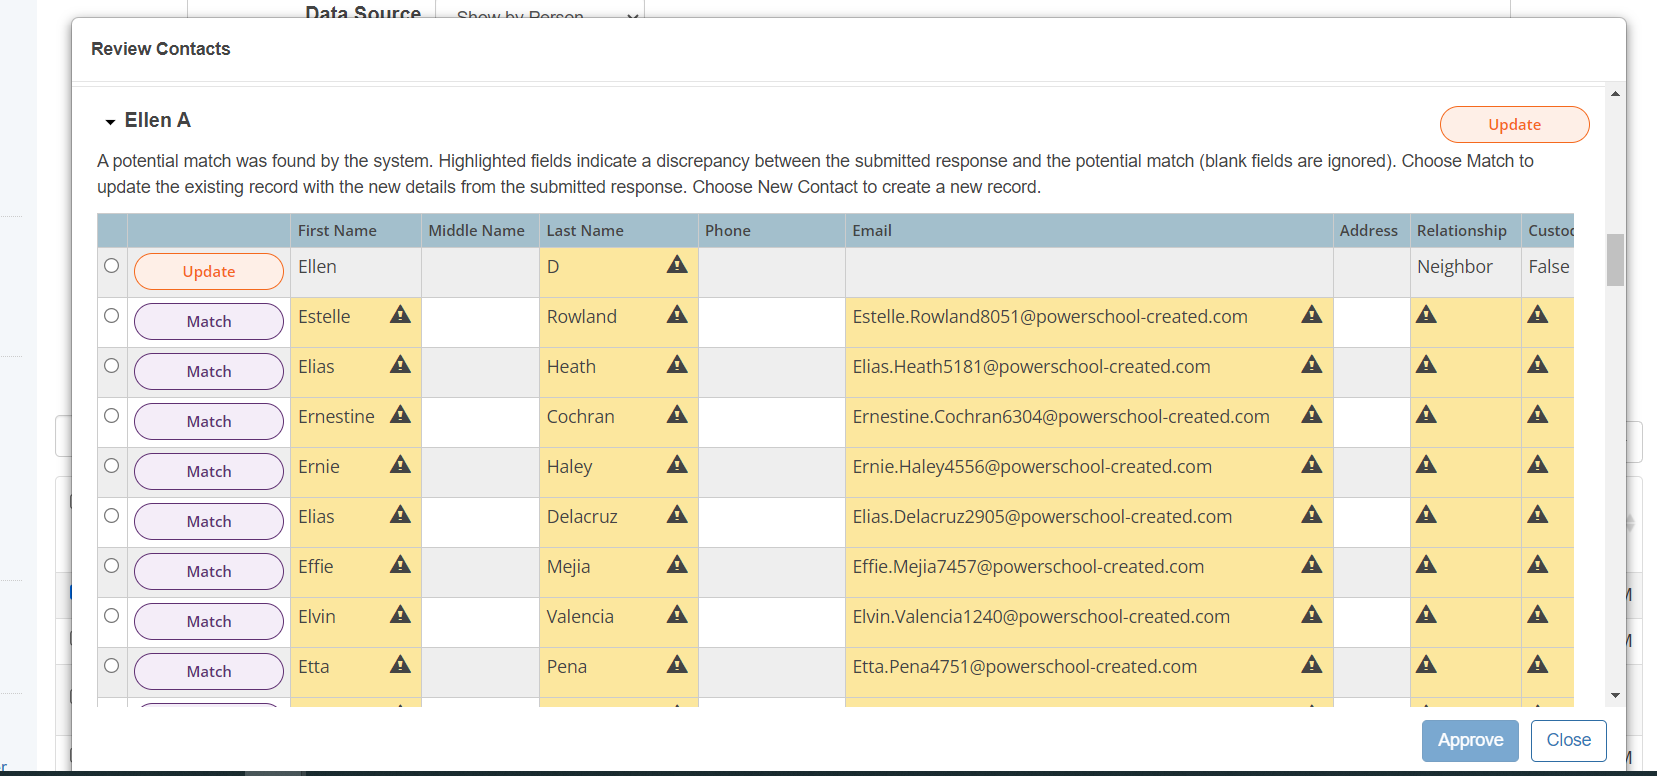
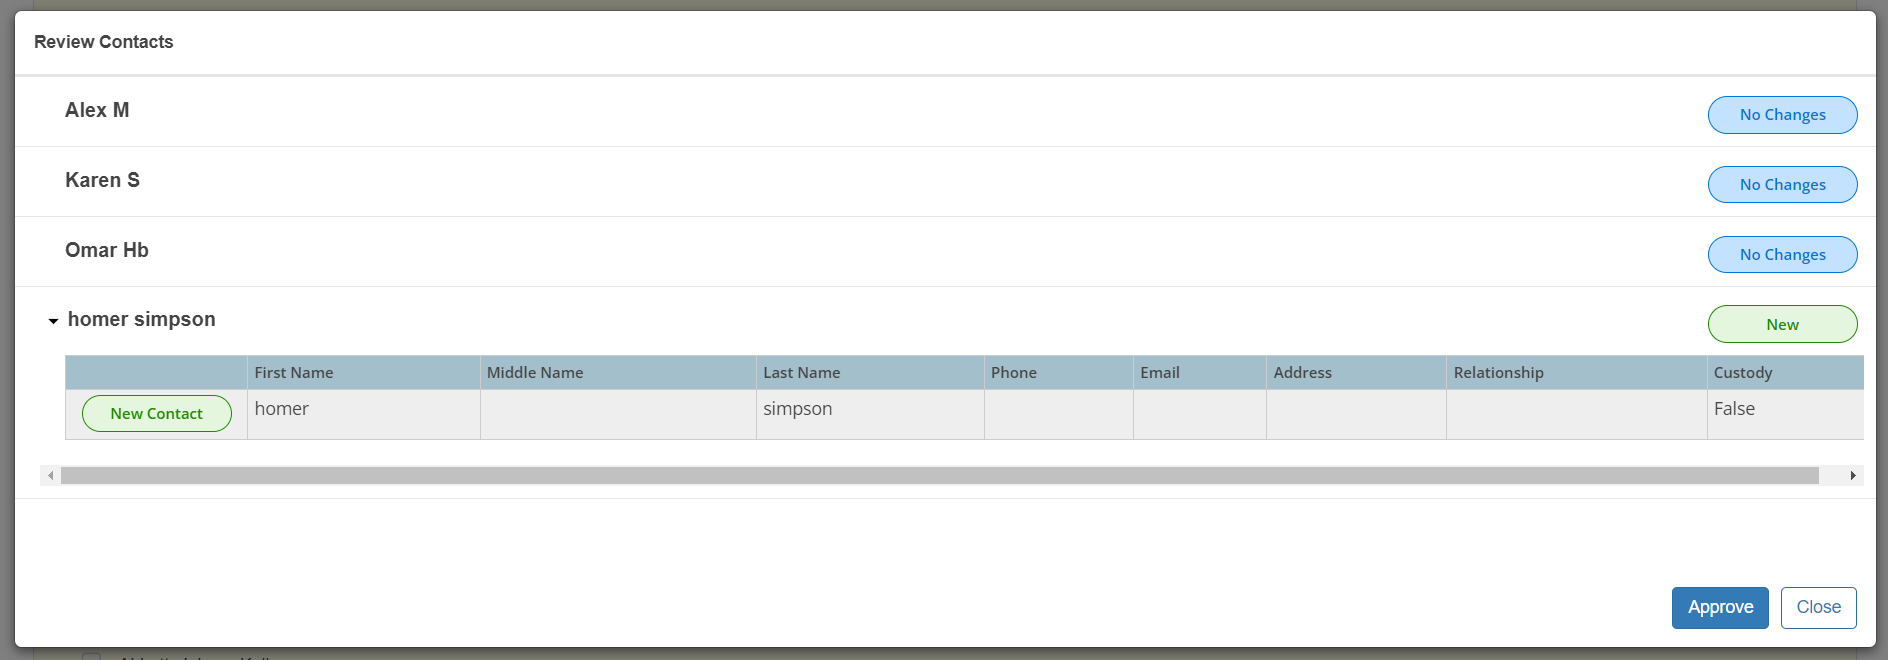
Review Contacts Window
After entering the password, the Review Contacts Window allows administrators to confirm or adjust how contact data is processed. Within the window, each contact is assigned a status:
-
No Change – No updates were made.
-
Update – An existing contact has been modified.
-
New – A new contact has been added.
-
Match – A new contact was matched to an existing record.
-
Delete – A contact was marked for deletion.
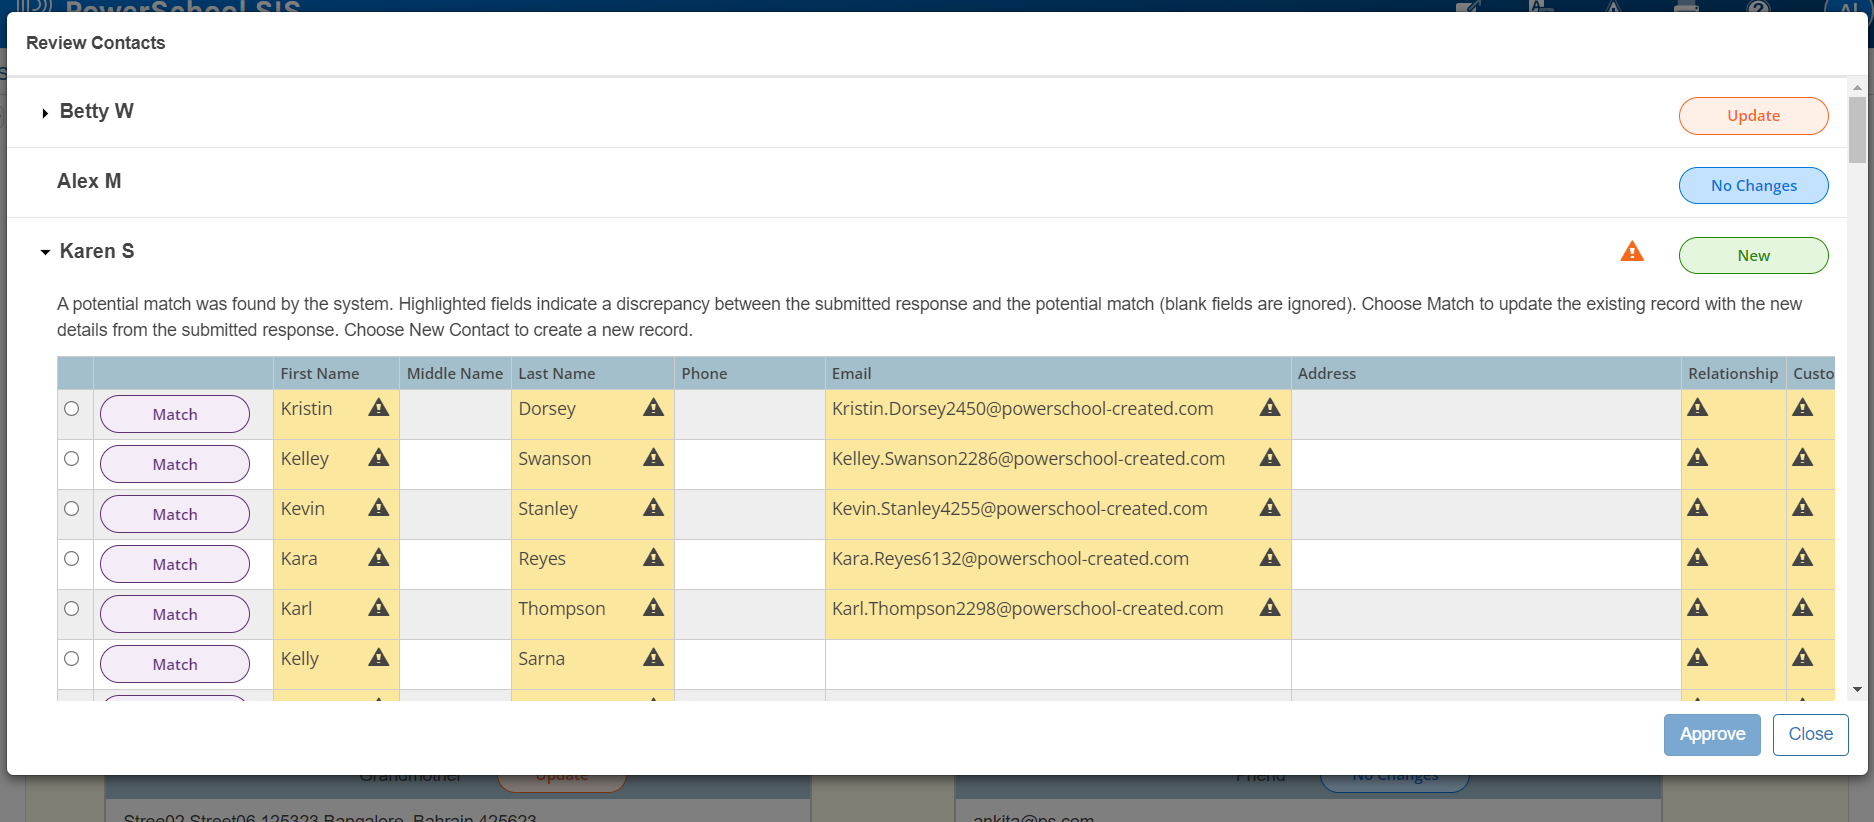
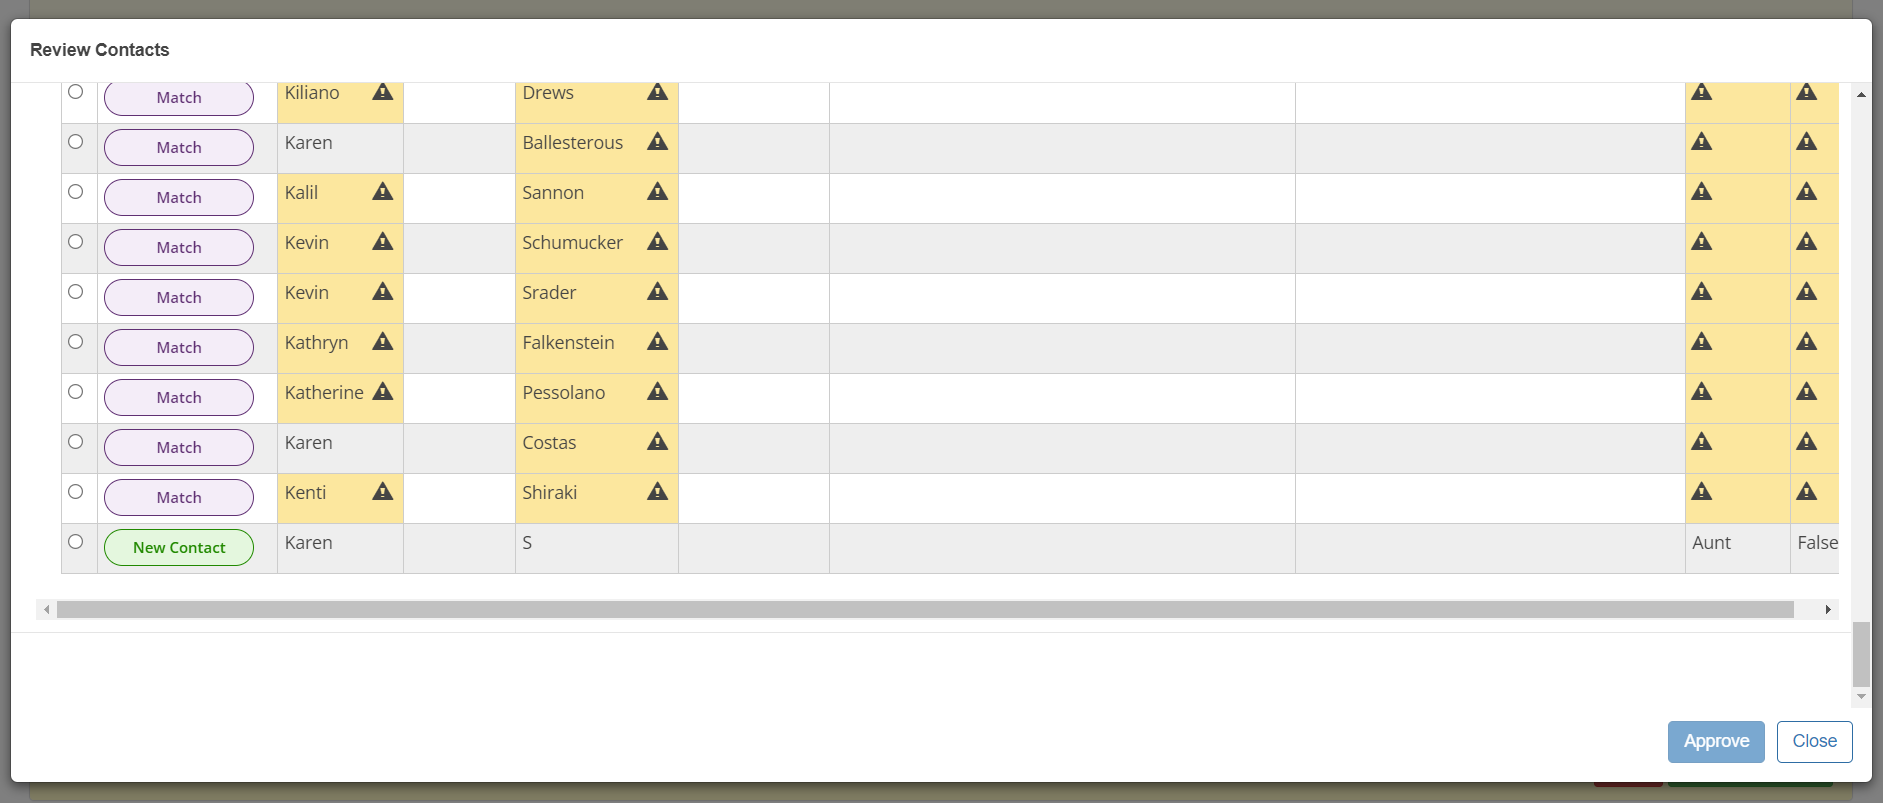
For contacts with New or Match status, administrators can explicitly choose New Contact to create a fresh record.
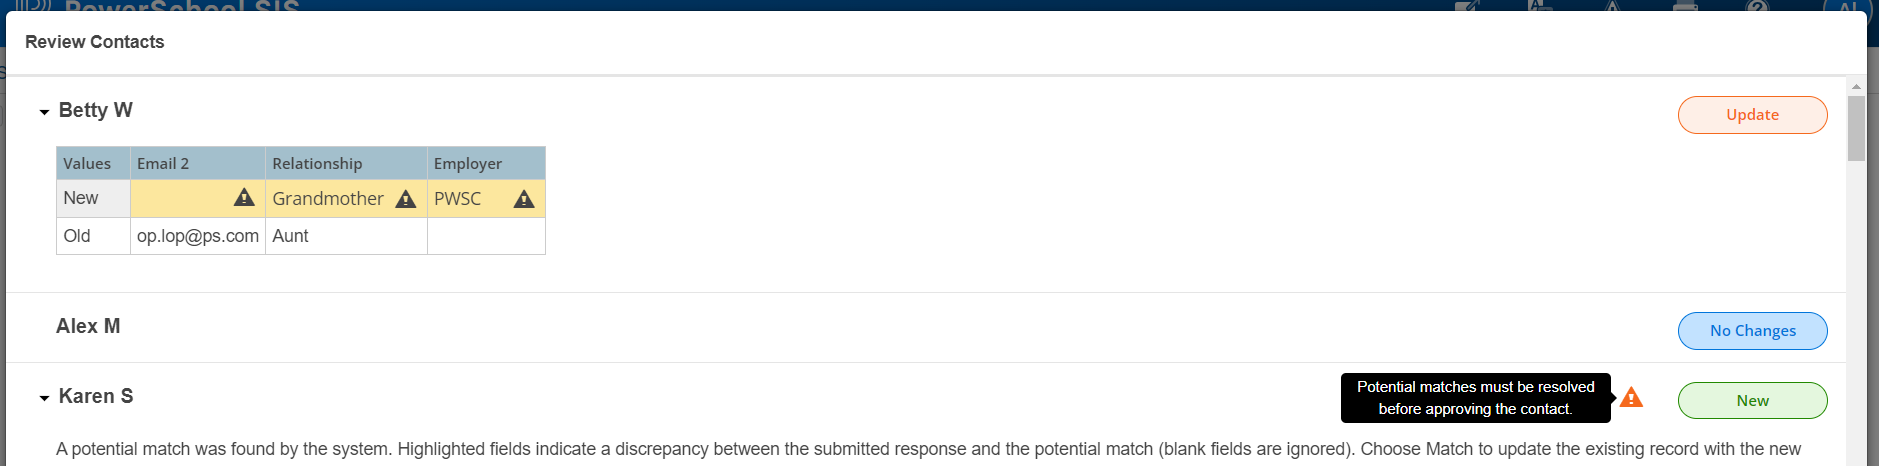
The Approve button in the window remains disabled until all potential matches are resolved. Warnings are shown for unresolved items.
When potential matches are resolved, administrators can view a success message in the review contact window and can proceed with approval.
The approval button will enable users to send contact data to PowerSchool SIS.
A similar workflow can be triggered from Response Reports.
Approval and Data Delivery
After approval, the contacts data will be delivered and updated into PowerSchool SIS, and Administrators will see the message: Thank You! Successfully approved response.
Responders will be displayed the Viewing Response message when they access the form response again (indicating the record is approved).
The contact data is delivered to PowerSchool SIS with the following outcomes:
-
New – a new contact will be added in PowerSchool SIS.
-
Update – an existing contact will be updated in PowerSchool SIS.
-
No Change – no changes will be made upon delivery in PowerSchool SIS.
-
Delete – an existing contact will be end-dated from the Student Contact Relationship. (Delete will not remove the contact from the Student, but will be end-dating it based on the approval date. Similar to contact, contact addresses will also be end-dated.)
Responders such as parents will see their form status updated to reflect approval.
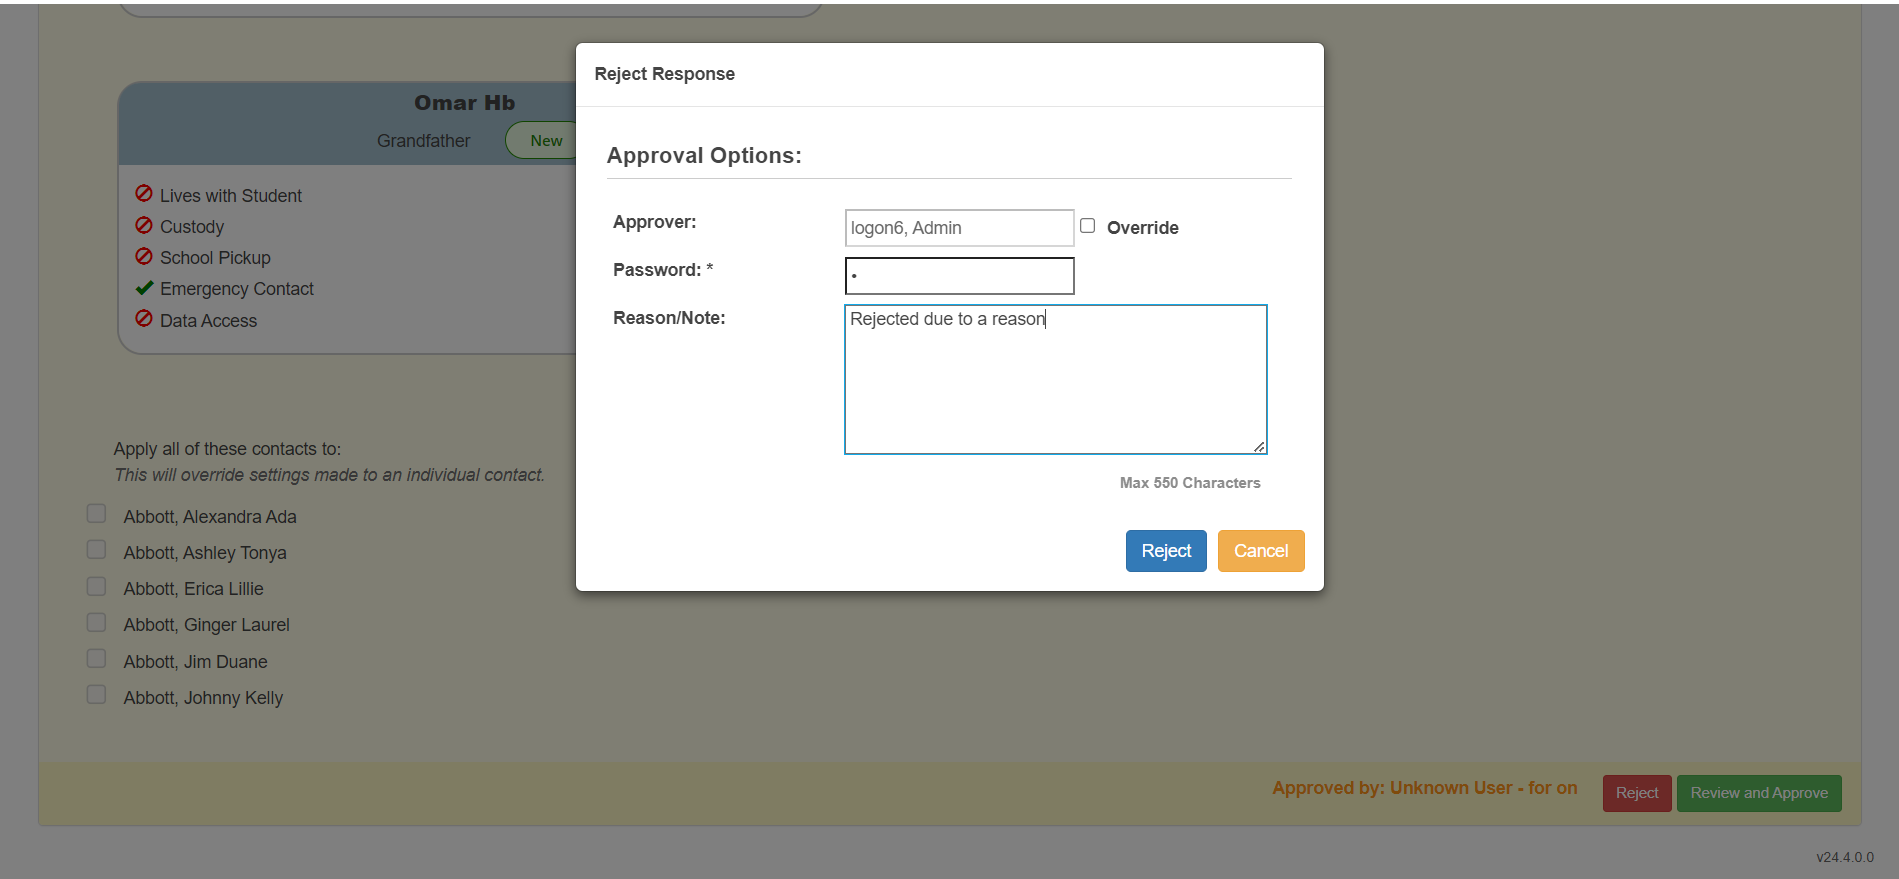
Rejections and Edits
If a form is rejected, it returns to Pending Approval. Administrators may:
-
Edit and resubmit the form before proceeding with approval. This allows for minor edits before approval or data delivery to PowerSchool SIS.
-
Reject a form by adding a Rejection Reason.
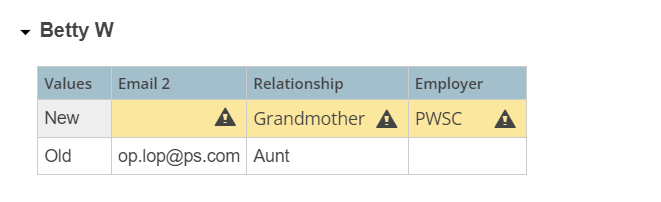
Update Contact Review Table
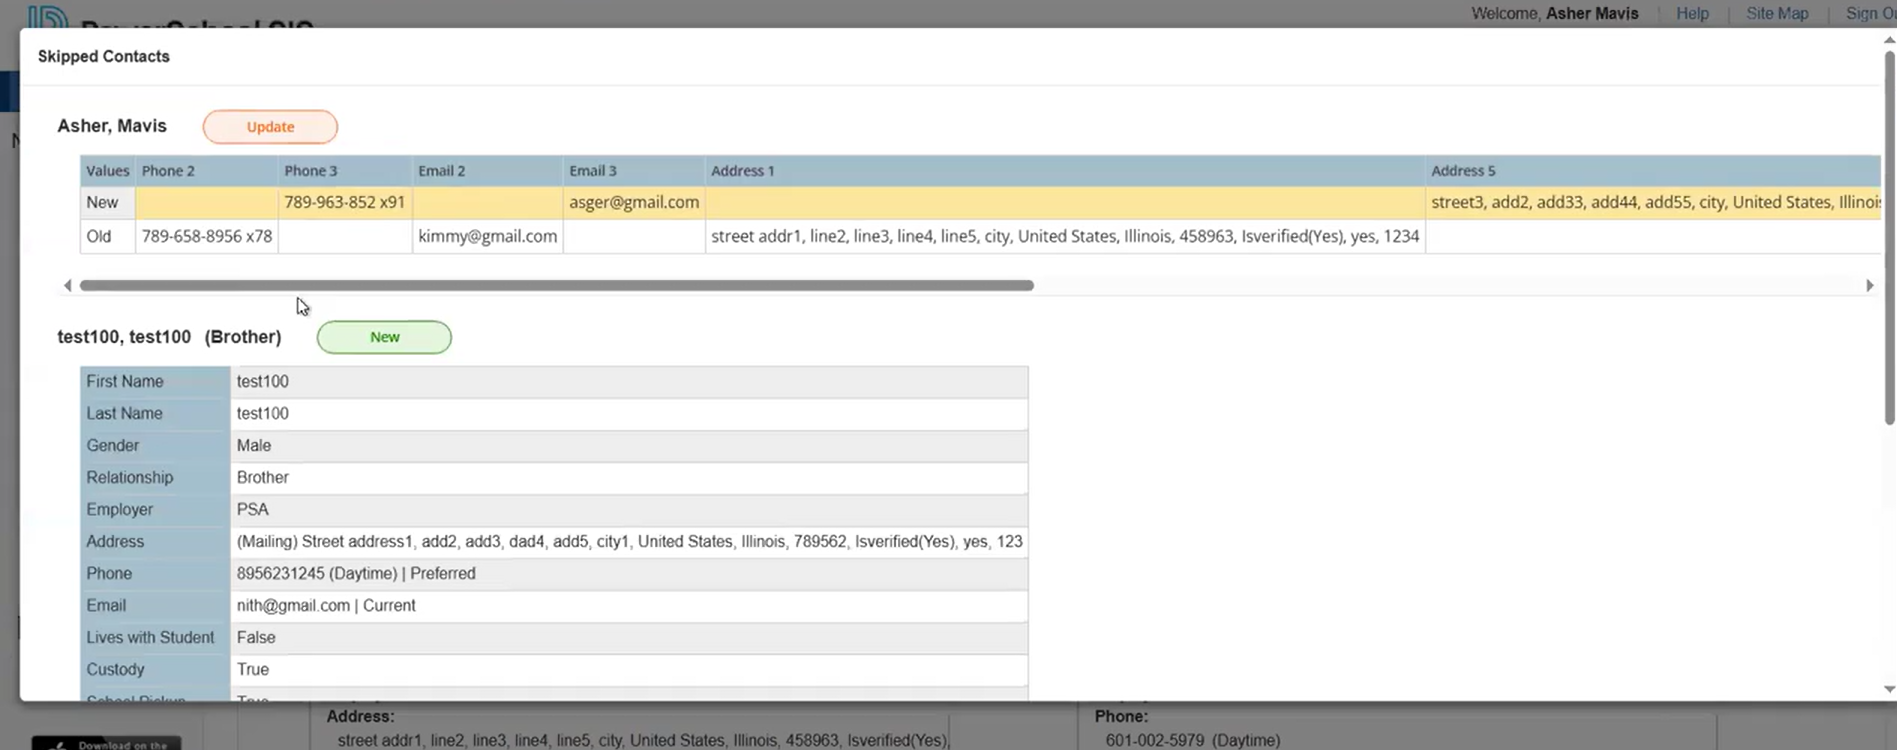
When a contact is updated, the following review table appears in the Review Contacts window to provide reference to administrators on updated fields. This applies only if the update does not involve the First Name or Last Name. The table includes two rows that show the Old and New values for comparison.
Special Handling of Name Updates
Changing a contact’s first or last name requires special handling. Parents often intend to create a new contact when renaming, but direct updates can inadvertently affect shared records.
To prevent this, when a parent edits a contact name, they are prompted with three options:
-
Create New Contact and Remove Existing
-
Create New Contact and Retain Existing
-
Update Existing Contact
This will reduce the instances where contact identify linked with other students is accidentally updated due to changes made by one parent submission.
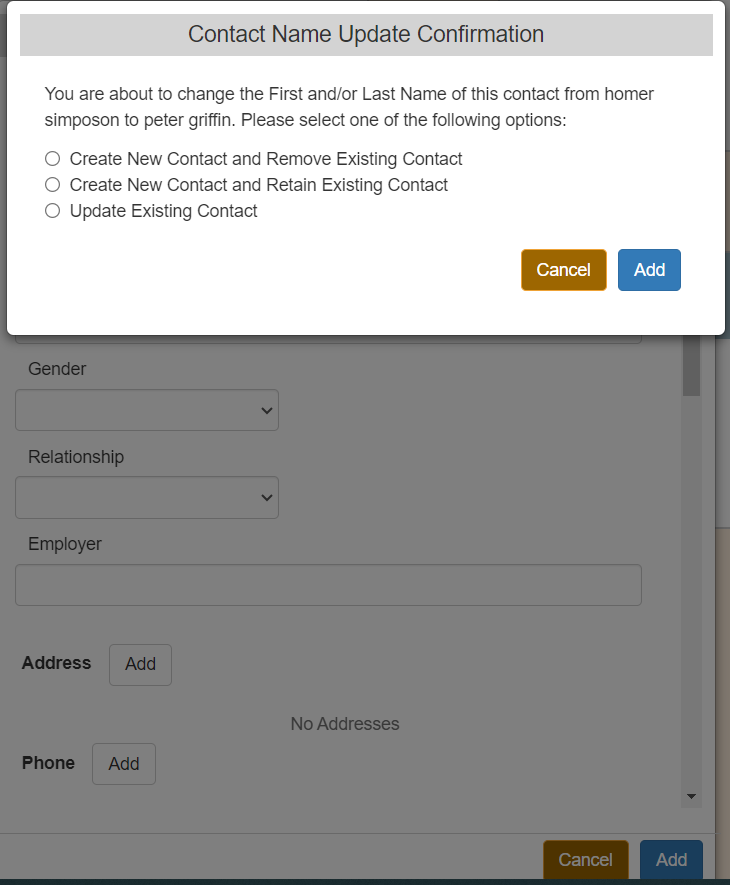
Further validation is added for the Administrator approval. When Parents update the contact with the third option mentioned, administrators can choose to update the existing contact or match it with new contacts, as per the following window.
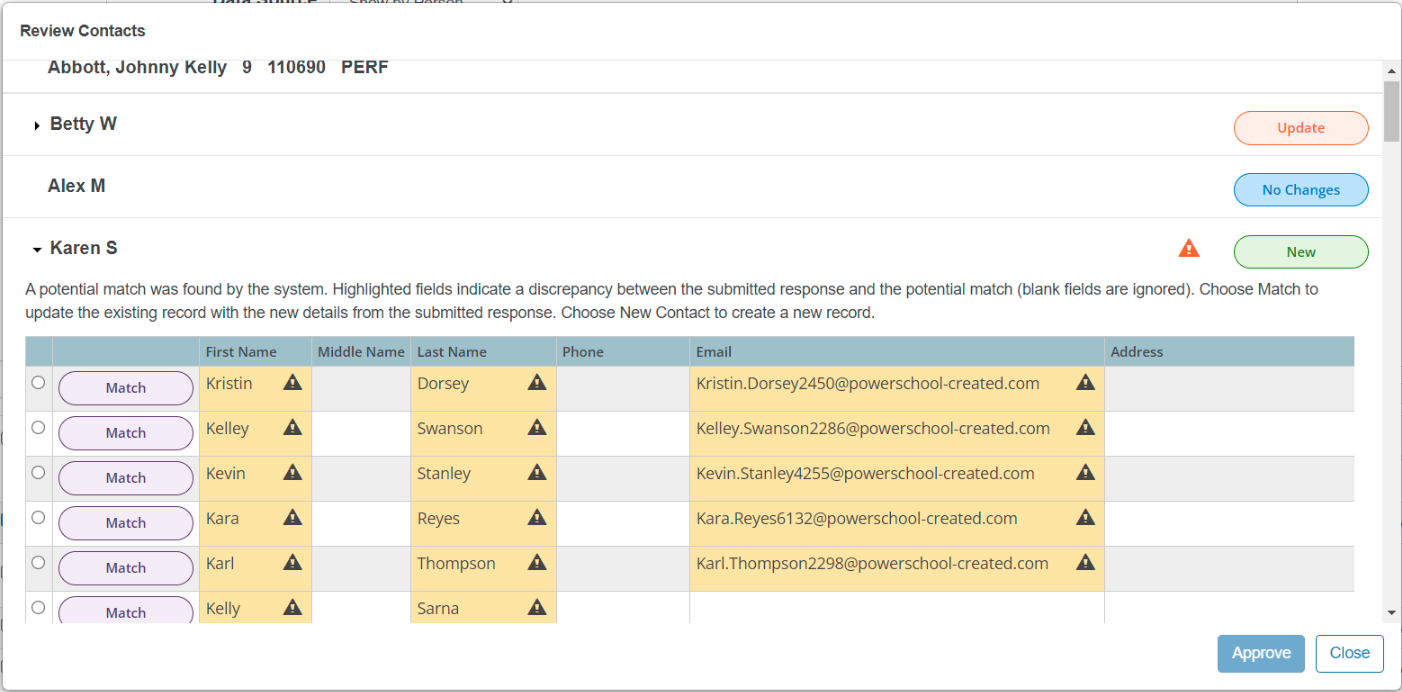
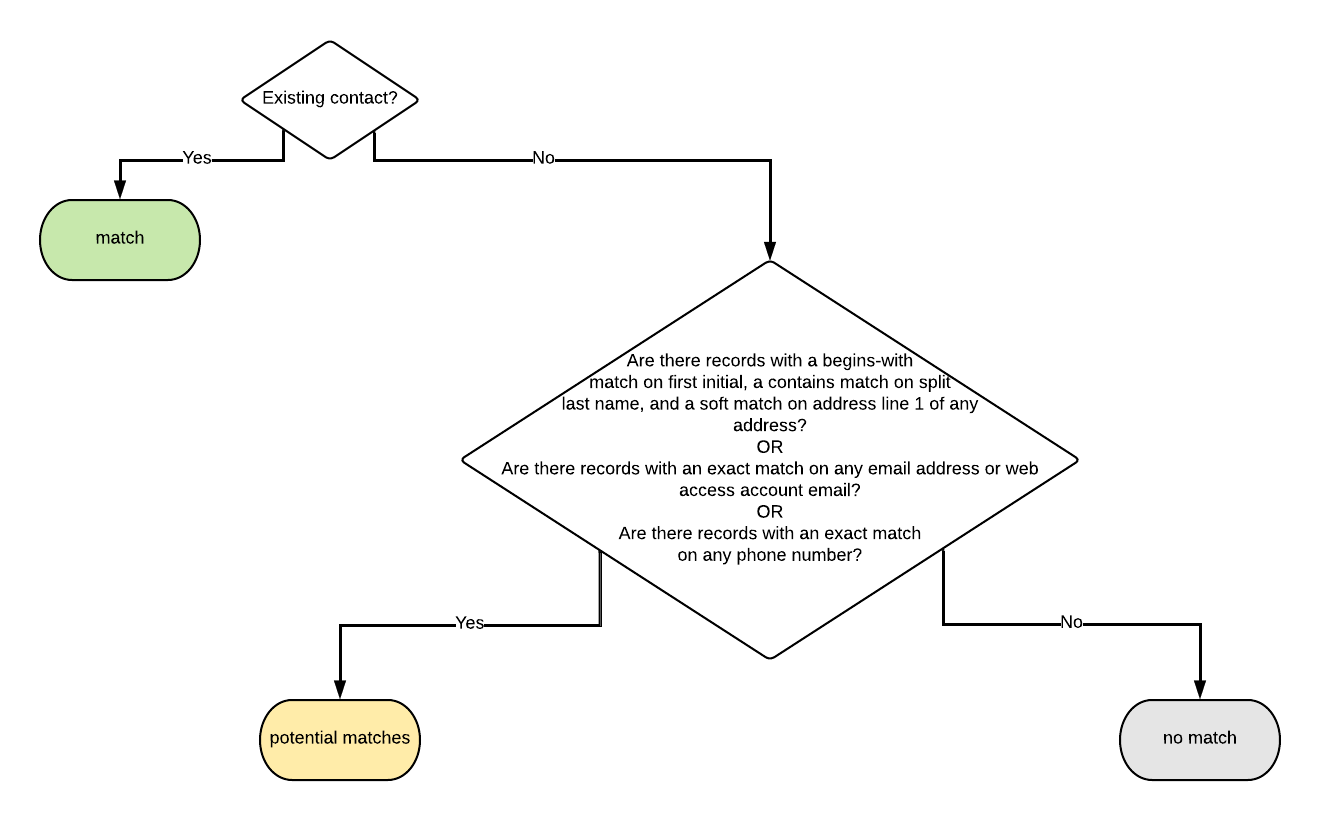
Matching Logic: Potential Matches with or without Auto-Match
When a new contact is added, the system compares the details against existing records in PowerSchool SIS.
-
When Auto-Match is disabled, the system applies matching logic on first initial, split last name, and soft match on address line 1 of any address, OR exact matching to phone numbers and email addresses.
Potential Matches when Auto-Match is disabled
-
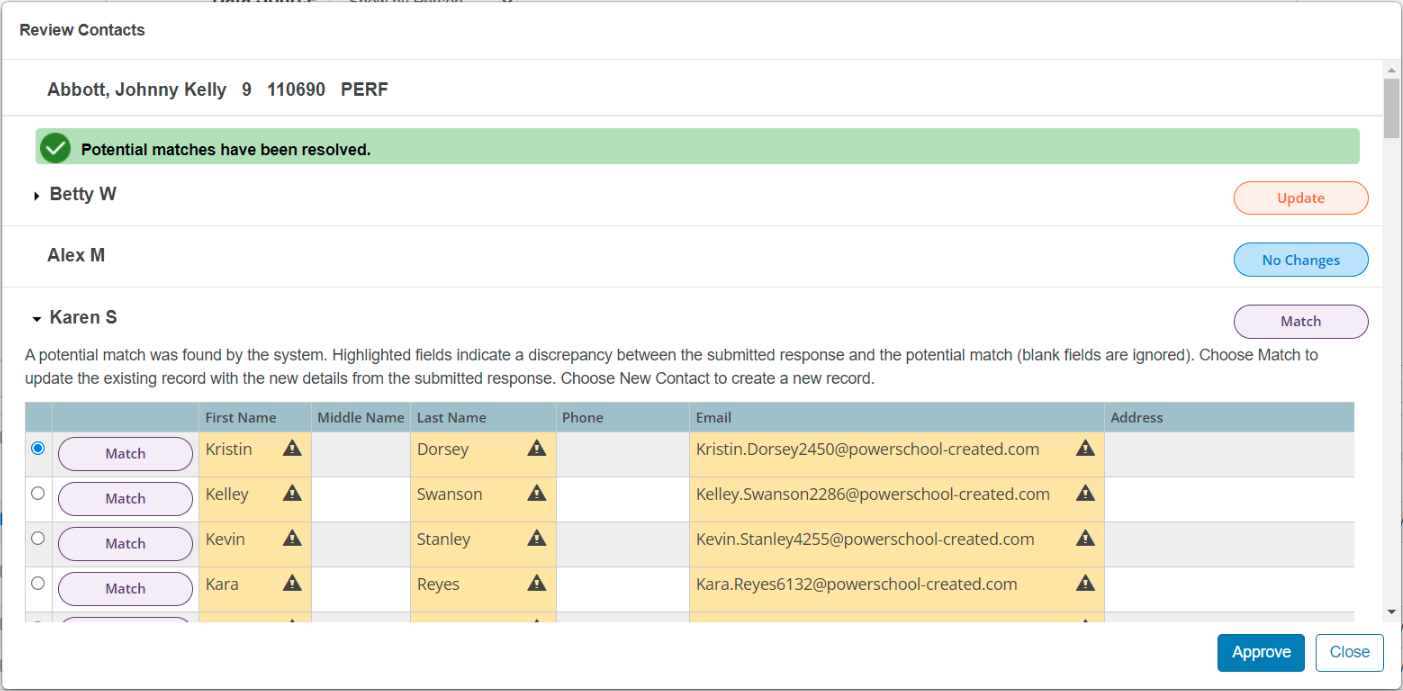
When Auto-Match is enabled, the system applies the auto-match option to show only that contact match when there are exact matches on first name and last name, with either a match on phone or email, or a soft match on address line 1 of any address, AND if there is only one match available. If there is more than one match, the system will continue to use potential matches, including those matches found based on the first initial, split last name, and soft match on address line 1 of any address, OR exact matching to phone numbers and email addresses.
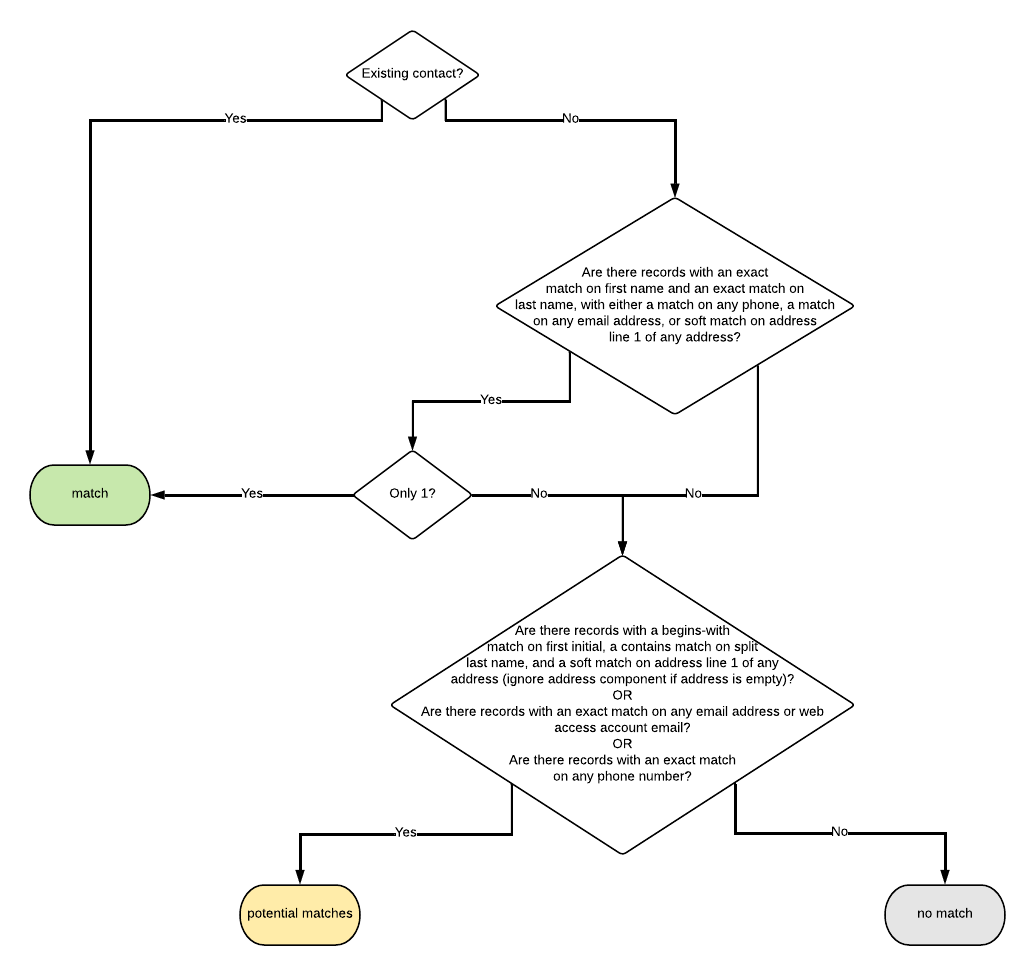
Potential Matches when Auto-Match is enabled
Auto-Match option is managed via:
System Management – Forms – Manage Contacts Auto Match and Auto Approval (formerly Enable Contacts Auto Match).
Option Name: Auto-match and update form new contacts when exactly one match is found.
When enabled, the matching logic will process, and the Review contact Window will display only one auto-match.
ID-based match criteria (Manage Contact Match Criteria) are also supported.
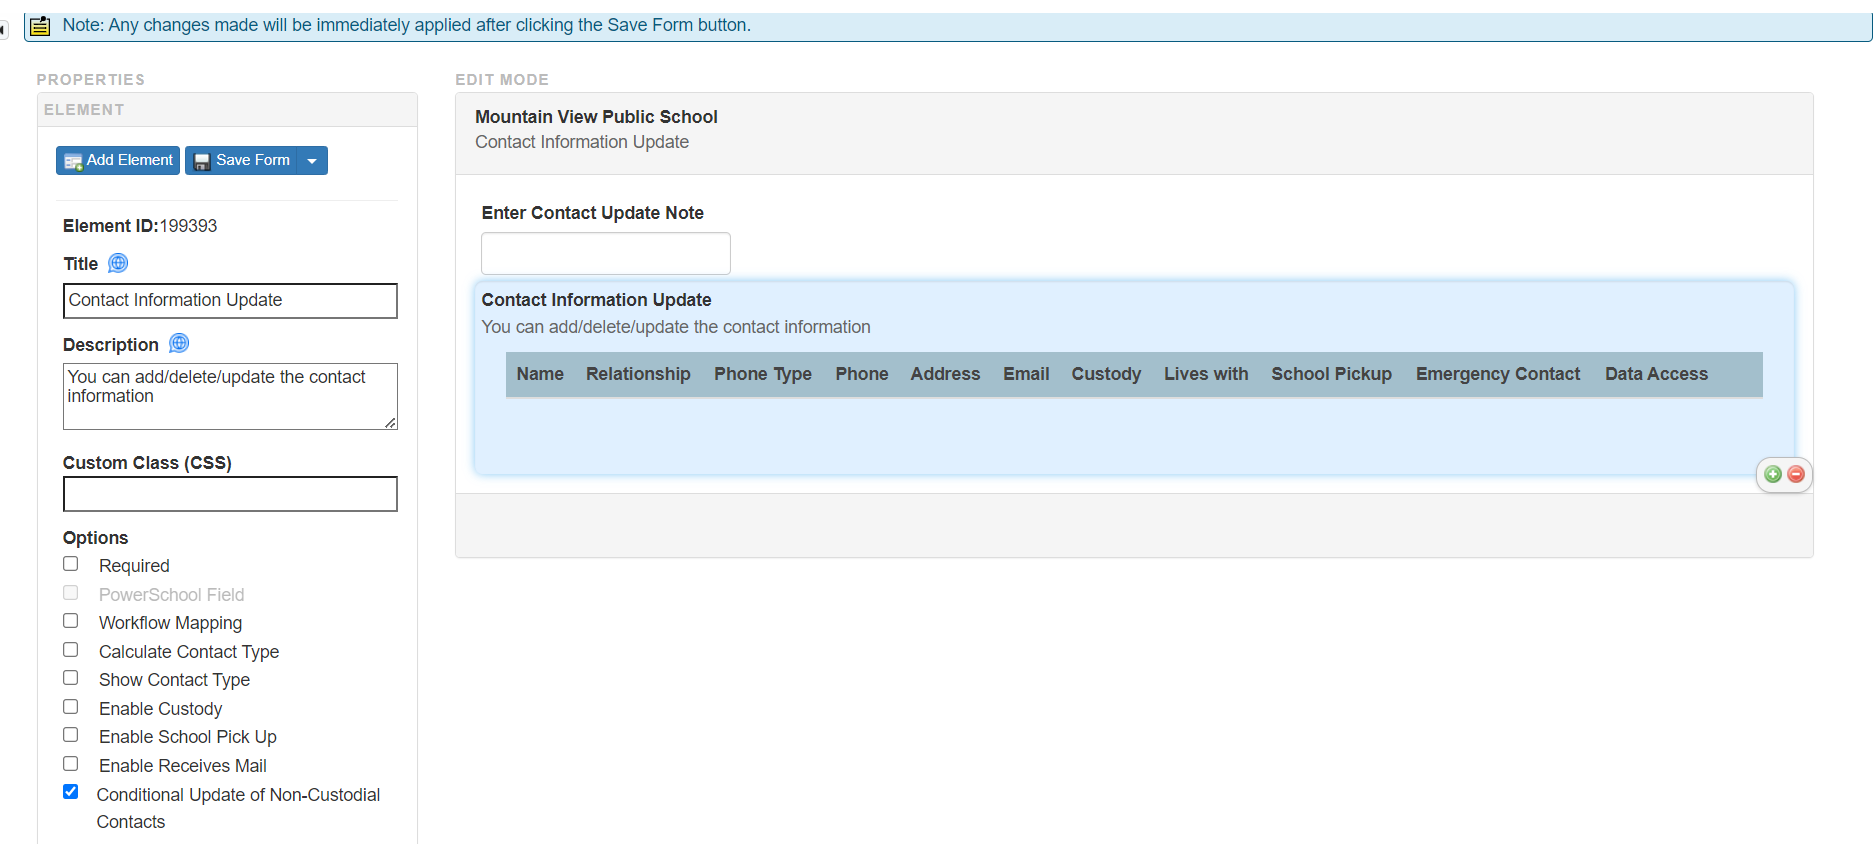
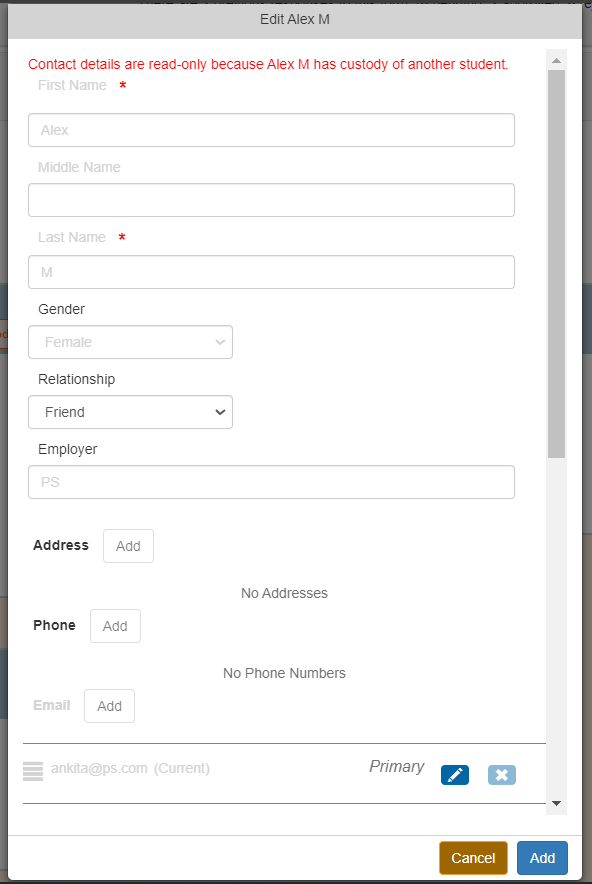
Conditional Update of Non-Custodial Contacts
When the Conditional Update of Non-Custodial Contacts option is enabled, the configuration controls whether contacts can be edited depending on how the Contact is associated with current and other students. This configuration validates that contact information or identity is not changed accidentally due to administrator or parent changes.
-
If a contact shares custody with another student but not the current student, responders cannot edit the contact using the Edit option on a Contact Card. They may only update the relationship value.
-
If the contact shares custody of both the other and current student, editing is allowed.
-
If there is no shared custody, editing is allowed.
During approval, if an administrator attempts to match a custodial contact, warnings are displayed to clarify which fields will or will not be updated.
Conditional Update Check upon Contact delivery to PowerSchool SIS
This check is also applicable while delivering contacts to PowerSchool SIS, that is, before approval, if the contact is sharing the custody of any student in PowerSchool SIS (both for Match and Update Status).
-
If the user selects a match, then the following message is displayed after the existing message on the Review Contacts window:
-
A potential match was found by the system. Highlighted fields indicate a discrepancy between the submitted response and the potential match (blank fields are ignored). Choose Match to update the existing record with the new details from the submitted response. Choose New Contact to create a new record.
-
-
The following message is displayed against the contact matches in the Review Contacts window to ensure the user fully understands what will be delivered upon selecting such a match:
-
Contact details, except Relationship information, will be skipped as Contact $ContactFirstName $ContactLastName shares the custody of another student.
-
The error will be removed upon a change of match where custody is not shared.
-
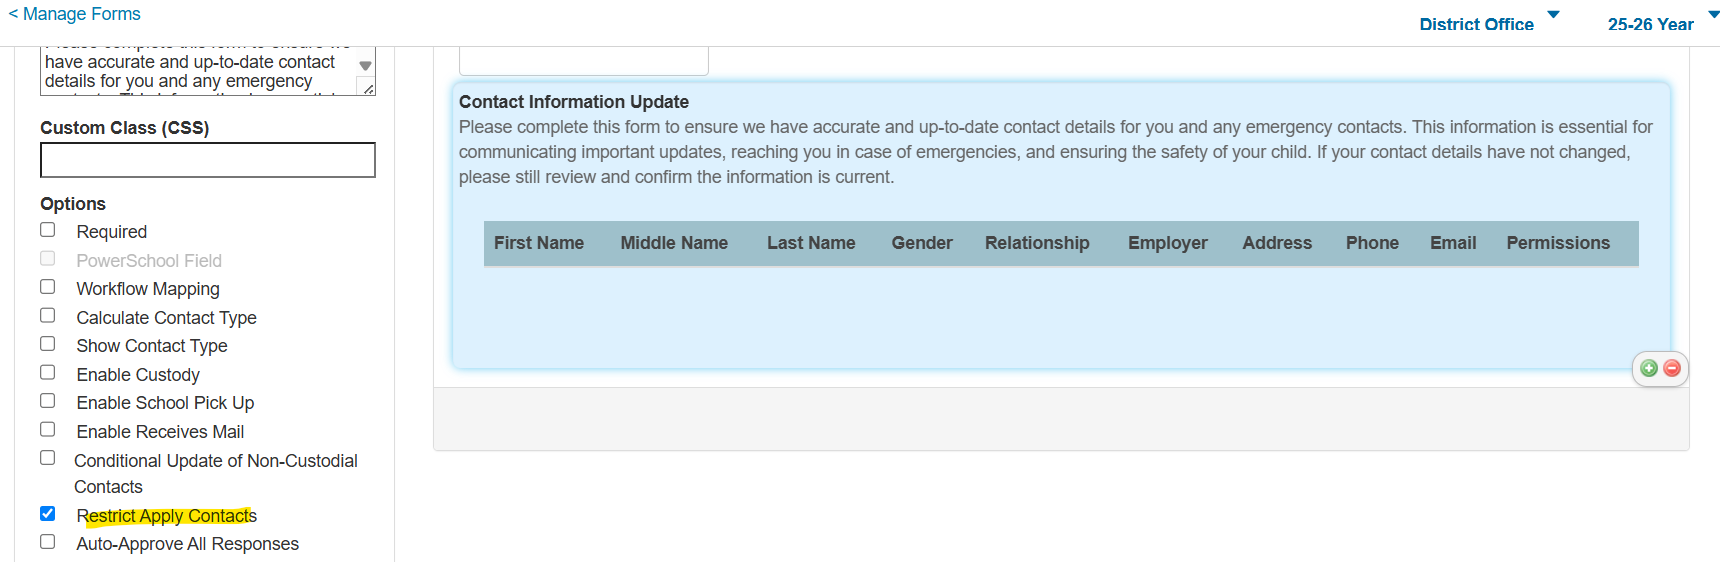
Restrict Apply Contacts
When this Restrict Apply Contacts option is enabled on the contact element in the Form Builder, the contact management experience is simplified for responders by hiding the Apply Contacts to option within the edit contact window of a form response and by hiding the Apply all these Contacts to section in the contact element within the form response.
This impacts all responder views, including Administrator, Teacher, Student, and Parent.
This gives administrators more control over how contacts are applied within forms to individual students, allowing for cleaner and easier contact management.
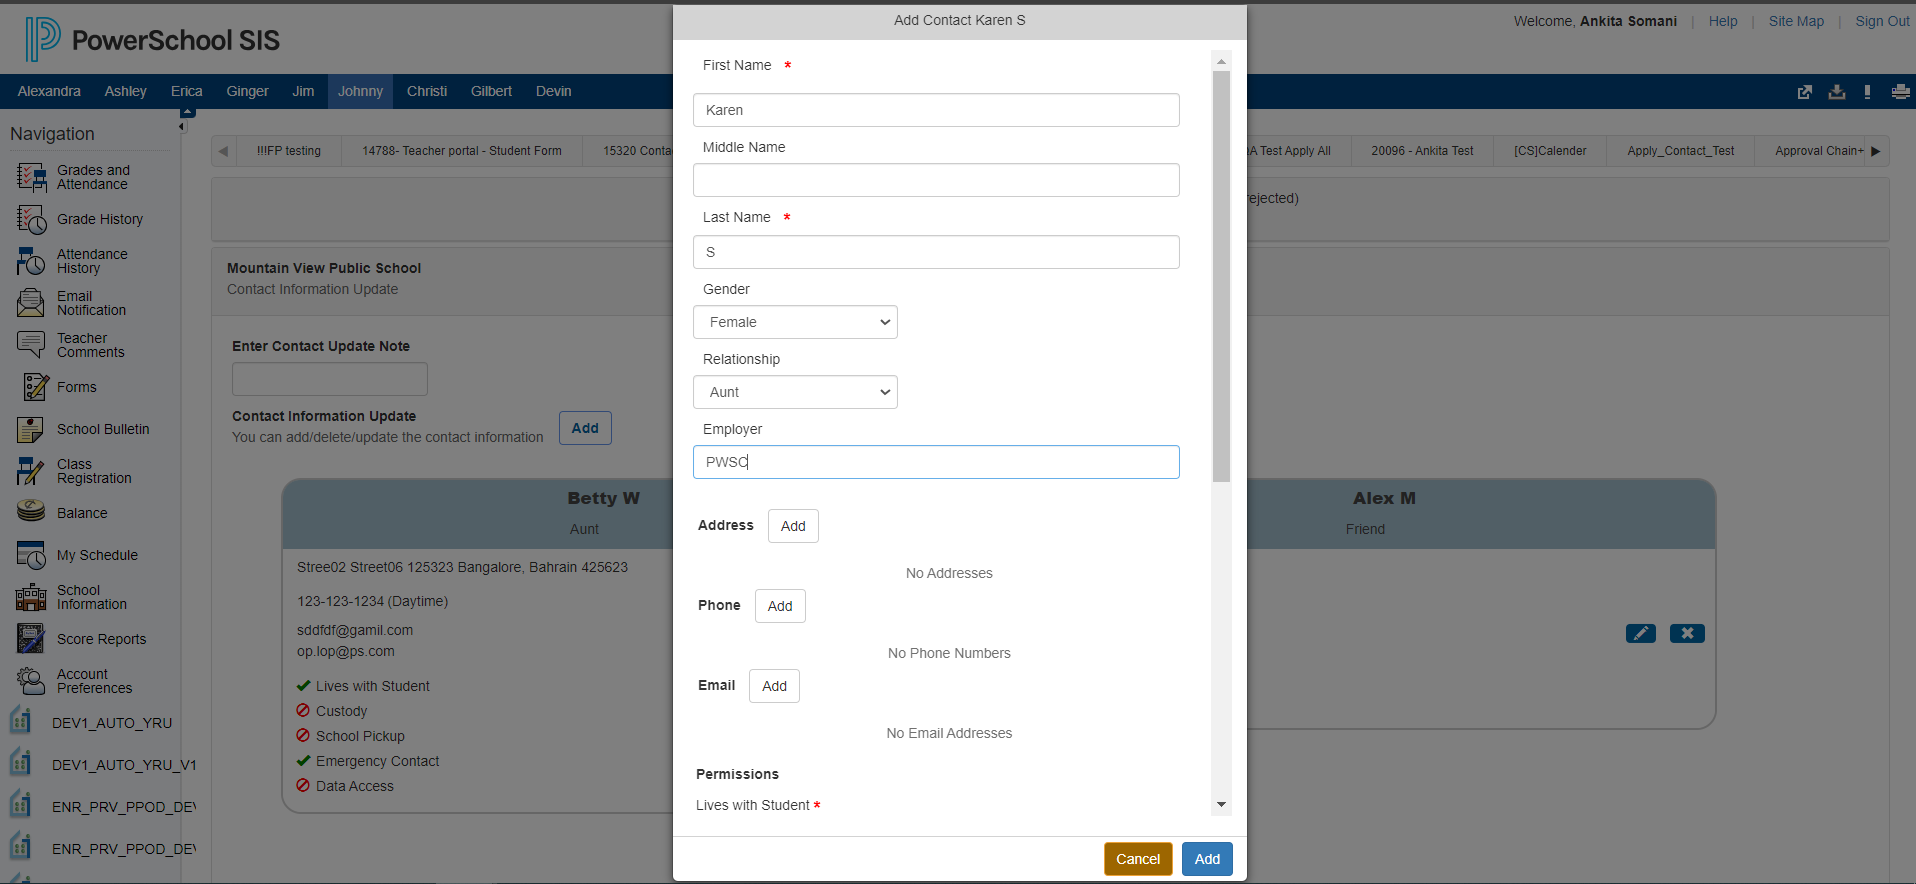
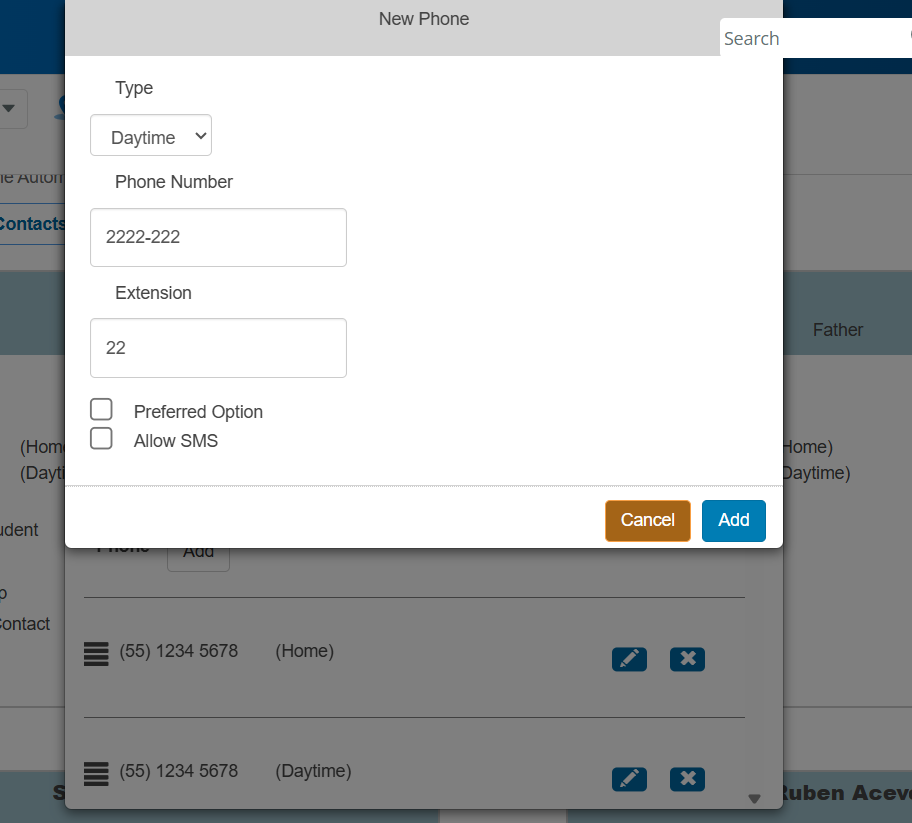
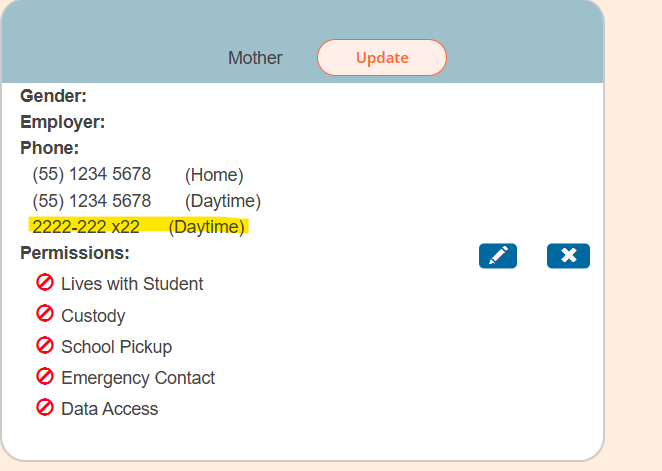
Contact Phone Number Extensions
Responders can add and edit phone number extension details directly within the contact element. The system automatically displays the phone number extensions from PowerSchool SIS alongside the phone number and phone number type for all existing contacts within form responses. This phone number extension field enforces all field conditions set in PowerSchool SIS, preventing users from saving invalid data.
This impacts all responder views, including Administrator, Teacher, Student, and Parent.
On form response submission, phone number extensions are included with the form response data, allowing administrators to view them in the response reports and response details. As part of the form response approval workflow, the phone number extensions are displayed in the Review Contacts window for new contacts and contacts with potential matches and are sent back to PowerSchool SIS as part of the update.
Skip Errored Contacts in Response Approval
If certain contacts within a response failed to deliver due to encountering errors, the entire record would remain in a pending approval state, preventing further action until the issue was resolved.
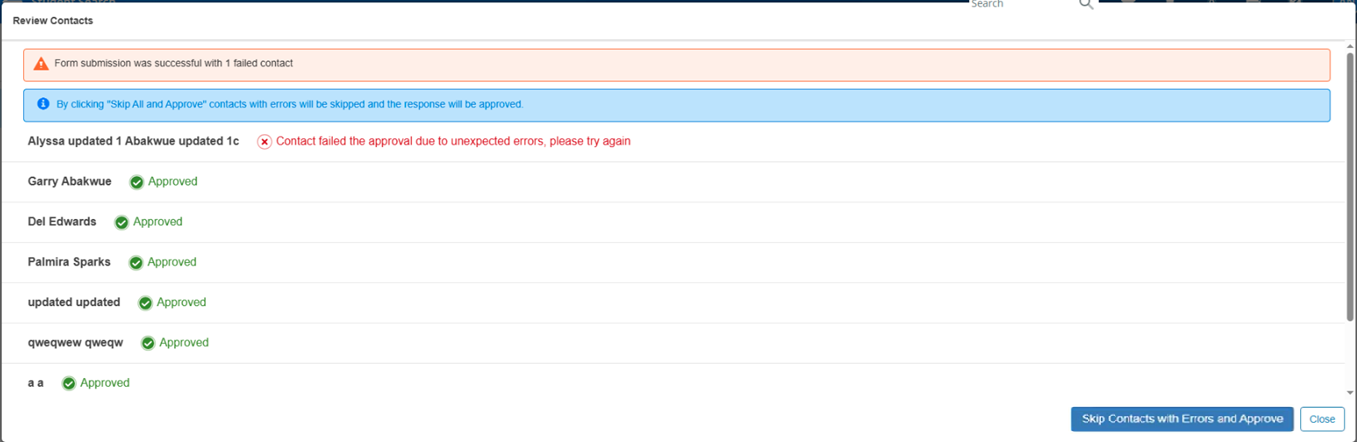
When at least one contact in a response encounters an error in the response approval workflow, the Approve button dynamically changes to Skip Contacts with Errors and Approve. This button appears after a user initiates approval and the system completes a delivery attempt, where some contacts are successfully delivered while others fail.
By selecting Skip Contacts with Errors and Approve, the system skips only the contacts that encountered delivery errors, approves the form response, and stores details of the skipped contacts within the response. When this occurs, an information icon is displayed next to the approval date and time. When selected, responders can view details about which contacts were skipped as part of approval.
Note that contacts without errors were already successfully delivered and updated in PowerSchool SIS during the initial approval attempt and will not be updated again.
If the Close button is selected and approval is not performed, no changes are made, and the response remains in a pending state. Previously delivered contacts retain their delivered status and display as No Changes on subsequent attempts. When the user initiates approval again, the system reattempts delivery for the remaining contacts. If errors persist, the Skip Contacts with Errors and Approve option is presented again.
This enables administrators to move forward and approve a response despite individual contact errors, reducing bottlenecks. However, after completion, the skipped contacts' data is not updated in PowerSchool SIS, which would require further manual action.

To correct the errors and then reattempt to approve the response without skipping any of the contacts, the administrator should cancel out of the response workflow, adjust data in the response and/or in PowerSchool SIS, and reinitiate approval of the response.
Auto-Approve All Responses
When the Auto-Approve All Responses option is enabled on the contact element in the Form Builder, the system attempts to approve responses automatically, including the creation, update, and deletion of contacts, aimed at reducing the administrative burden of manually approving each response and manually making contact-matching decisions as part of that workflow.
-
When attempting to auto-approve each response, the system performs matching against each contact (supporting both the default and ID-based contact matching logic). Contacts that have a definitive match are updated. Contacts that have no match are created. However, contacts that have one or more potential matches require a matching decision to be made.
-
When the Auto-Approve All Responses option is enabled on the contact element in the Form Builder, the Create New Contacts for Potential Matches sub-option is available.
-
When the Create New Contacts for Potential Matches sub-option is disabled, any response that contains at least one contact that has one or more potential matches that are not auto-approved and is flagged for manual review.
-
When the Create New Contacts for Potential Matches sub-option is enabled, responses that contain any contacts that have one or more potential matches are auto-approved, and those contacts with potential matches are created as new contacts.
-
Regardless of the Create New Contacts for Potential Matches sub-option, if any existing contact within a response has its first or last name changed, that response is not auto-approved and is flagged for manual review, to ensure the identity of a contact potentially linked to other students is not inadvertently altered.
-
Regardless of the Create New Contacts for Potential Matches sub-option, if any contact within a response encounters an error as part of the data transfer to PowerSchool SIS, that response is not auto-approved and is flagged for manual review.
-
-
Responses that are not successfully auto-approved remain in the pending approval status, display a warning icon and tooltip explaining the failure, are flagged for manual review, and are skipped in subsequent auto-approval processing. These responses require manual review and approval.
This auto-approval process is executed once daily, as opposed to on demand with each response submission. This process is configurable within the menu path: System Management – Forms – Manage Contacts Auto Match and Auto Approval (formerly, Enable Contacts Auto Match). A Daily Processing Time for Contacts Auto Approval setting is available. This setting defaults to 3:00 AM (UTC), but it is advised to be set to a time at night for your district locally when there is typically low traffic and utilization of system resources.