
Score inspector
Use the score inspector to provide details about the student's performance when entering scores or grades, such as:
-
Flag assignments that are missing, were received late, or were collected but not yet scored or graded.
-
Indicate assignments that are incomplete because of student exemption, student absence, and other reasons.
-
Enter a comment about a student's score or grade.
Select a score or grade cell on any page with scores or grades to access the score inspector. Use the arrows within the inspect to navigate between students, scores, or grade columns.
Comments
Use comments to record specific details about a student’s performance when entering assignment scores or final grades. You can add comments manually or choose comments from the comment bank.
If you previously used PowerTeacher Gradebook, you can import the comments into PowerTeacher Pro.
Do not use emojis when entering comments. The process to transfer student records fails if invalid characters, such as emojis, are present in the teacher comments from the district from which the student transferred.
If a comment was entered by a different teacher, the teacher's name is appended to their comment.
Manual comment entry
There are two ways to add a comment manually in the score inspector:
-
Enter your comment directly in the Comments field.
-
For a larger text field, click the Comment icon and enter your comment.
Comment bank
To add a comment from the comment bank:
-
Click the Comment icon in the score inspector.
-
Click Show Comment Bank.
-
Click the gear icon.
-
Choose either the district comment bank or your comment bank.
-
Choose if you want comments separated by a line break or space.
-
-
To add comments to a score, click the plus sign icon ( + ).
-
To read a comment, click the Comment icon in a score cell.
-
To delete a comment, click Clear Comment.
-
To close the comment bank, click Hide Comment Bank.
To manage comment banks:
-
Click the Comment icon in the score inspector.
-
Click Show Comment Bank.
-
Click the gear icon.
-
Click Manage Options to open the Comment Bank page.
-
Select the tabs to switch between My Comments and District Comments.
-
Use the Filter to limit comments available in the Comment Bank.
If there is no filter, click the gear icon and select Show Filter. -
Optionally, click a star icon to flag a comment as a favorite. You can then sort to display your favorite comments first.
Smart text
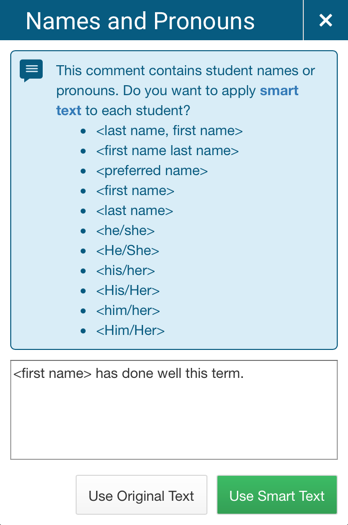
Use smart text to insert specific student information automatically. For example, if you enter a comment for one student that says "<first name> completed all assignment tasks," and then added the comment for more than one student, each student's name is personalized in their comments.
Comments from the comment bank will be truncated if smart text increases the comment length over the maximum length.
When you use the Fill functions to fill comments with smart text, use the Names and Pronouns dialog to confirm whether you want to apply smart text or use the original text. Click the smart text link on the dialog to display the available smart text codes.
Bulk comments
Use bulk comments to add the same comment to multiple student assignments or records. Similar to the comment bank, comments can be customized using smart text.
To add a bulk comment:
-
Click Grading, and then Standards.
You can also add a bulk comment through the Comment Verification page, Scoresheet page, Assignment Details page, and Traditional Final Grades page. -
Select a standard column header.
-
Select Bulk Comments.
-
Select students.
Use filters to narrow the list of students. -
Enter the comment.
If you use smart text, consider the character length of the information the smart text will insert into the comment. This text, while not present when editing the bulk comment, will prevent the comment from being created if it increases the character count over the limit. -
Indicate how the new comment should interact with existing comments.
If you choose Appending to Existing, the bulk comment will not be created if the resulting comment exceeds the character limit for any record. -
Click Save to enter this comment and start a new one or click Save and Close to save this comment and close the page.
Scores and grades
Add and modify a score or grade
To add a score or grade, enter it directly into the score field in the score inspector, or use the numbers on the keypad to enter it.
To delete a score or grade, click the less than (<) or delete (x) button next to a score or grade to delete it.
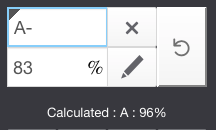
When you modify a final grade, the originally calculated grade displays on the score inspector. If a grade was modified from its calculated value, a black triangle is displayed along with the grade. Click Undo to revert to the original calculated grade.
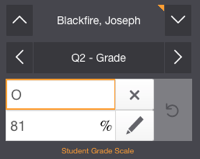
If a student grade scale was assigned to a student, a message alerts you that this score's grade scale differs from the class grade scale. An orange triangle is displayed near the student’s name, and the grade is highlighted with an orange border.
Use codes
If your PowerSchool administrator has provided special codes, select Codes, and then select the applicable special code from the dialog. The special code and the associated score attribute display on the scoresheet.
Default special codes are INC (incomplete), ABS (absent), and MIS (missing).
Your PowerSchool administrator may add other custom codes for your use.
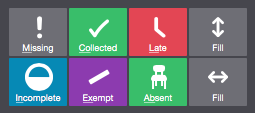
Add a flag
Choose a flag in the score inspector to add it to a grade or score. You can also add flags from your keyboard using hotkeys. Two underlined letters accompany each flag in the score inspector. If you have special codes that coincide with the hotkeys (for example, ABS for absent), you must enter the entire special code for the flag to display in the score field.
Fill functions
Use the Fill functions to fill grades or scores for one final grade or one assignment, for all of the students in a class or to fill all final grades or all assignment scores for just one student.
You can fill students' grades or scores vertically or horizontally. Grades or scores, flags, and comments are filled into cells that do not have existing content.
Fill only modifies fields that accept the filled value. For example, if you have a 10 point Points assignment and a 10 point Percent assignment, filling 10 would score both assignments with 10, so the student would receive a 10/10 for the Points assignment and a 1/10 for the Percent assignment as it is 10% of the assignment value.
Fill vertically
-
Select the grade or score cell.
-
Enter the grade or score or choose a score flag, and then enter a comment in the score inspector.
-
Click the vertical Fill option.
-
If a comment exists in the selected field, choose one of the following:
-
For assignment scores, select Scores, Flags, and Comments to fill in all blank score fields with the comment, score, and flags currently selected in the score inspector. For final grades, this option is called Grades, Flags, and Comments.
-
Select Comments Only to fill in all rows that do not currently have a comment. Grades or scores and flags will not be affected.
-
Fill horizontally
-
Select the grade or score cell.
-
Enter the grade or score, or choose a score flag, and then enter a comment in the score inspector.
-
Click the horizontal Fill option.
The Comments Only option is not available when filling horizontally.
Fill or clear cells
You can fill cells without content or clear grades, scores, or comments for assignments.
-
Select the grade or score cell.
-
Clear the values in the score inspector.
For example, clear the grade or score value, clear any selected flags, and clear the comment field. -
Click the vertical or horizontal Fill icon.
Summary area
The summary area is available on several pages in PowerTeacher Pro. However, the summary information varies based on the page and your selection. It provides an overview of assignment information and quick links to more details. If there is no summary area on one of these pages, click the gear icon and select Show Summary.
Assignments summary
-
Assignment: Displays the assignment name and, if applicable, the application that created the assignment in parentheses. This indicator allows you to track which integrated application created this assignment.
-
Score Type: Displays the assignment score type.
-
Score: Displays the score, its total points, weight, and whether it is exempt from the final grade.
-
Due: Displays the assignment due date.
-
Edit Assignment: Opens the Edit Assignment dialog.
-
Show More: Displays the grade scale (or student grade scale) and special codes.
Traditional final grades summary
-
Class Grade: Displays the reporting term of the final grade.
-
Grade Scale Type: Displays the grade scale type (alpha or numeric) followed by the range of grades in the scale associated with the selected class.
-
Calculation Method: (Numeric scales only) Displays the calculation method used to determine a student's grade when category or term weighting is applied.
-
Calculation: Displays the calculation formula type for the selected class.
-
Grade: Displays the grade, percent correct, and the points possible.
-
Show More: Displays the grade scale, including the final grade numeric scale percentage type if applicable, student grade scale, special codes, and formula used to calculate the final grade.
Standards summary
-
Class Grade: Displays the name of the standard associated with the selected standards score or standards final grade.
-
Grade Scale Type: Displays the grade scale associated with the chosen standard.
-
Calculation Method: (Numeric scales only) Displays the calculation method used to determine a student's grade when Category or Term weighting is applied.
-
Show More: Select the link to access the standard description, the standard hierarchy, the associated grade scale, and special codes associated with the chosen standard.